Category: Manuals Page 10 of 11

e yooso tkl manual

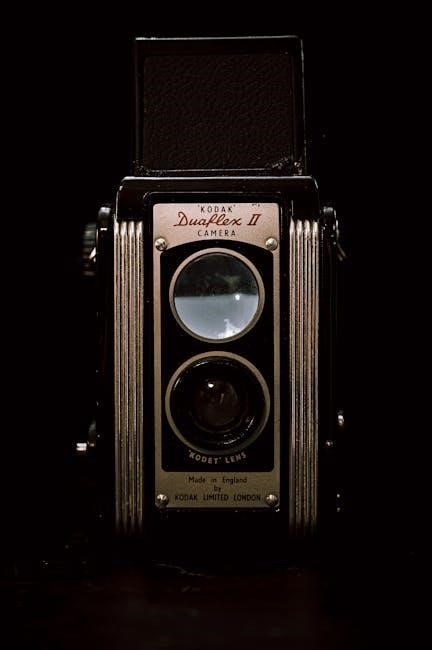
The E-Yooso TKL keyboard is a compact, programmable mechanical keyboard designed for both aesthetics and functionality. It features a tenkeyless layout, RGB lighting, and a sleek design, making it ideal for gamers and typists seeking a balance between style and performance.

What is a TKL Layout?

A TKL (TenKeyLess) layout is a keyboard design that removes the numpad, resulting in a compact and space-efficient format. It retains all essential keys while offering a more ergonomic typing experience. This layout is popular among gamers, typists, and professionals who value portability and desk space. The E-Yooso TKL keyboard embraces this design, providing a sleek, functional option for users seeking a balance between performance and convenience.

Design and Build Quality

The E-Yooso TKL keyboard features a durable metal panel, sleek design, and type-C connectivity, offering a robust build with modern aesthetics and reliable performance for both work and gaming.

Compact Design

The E-Yooso TKL keyboard boasts a tenkeyless layout, eliminating the number pad for a sleek, space-saving profile. Its 61-key design is ideal for minimal desk setups while maintaining essential functionality. The ultra-compact form factor makes it portable and efficient, perfect for both home and office use. With a focus on ergonomics, it reduces finger movement, enhancing typing comfort and productivity. The design caters to users seeking a balance between functionality and modern aesthetics without compromising on performance or usability.

Build Materials

The E-Yooso TKL keyboard is constructed with durable materials, featuring a sturdy metal panel for added rigidity and a type-C removable connecting line for convenience. While it lacks an aluminum plate, the build remains solid and long-lasting. The keyboard is designed to withstand regular use, with a focus on reliability and portability. Its compact frame ensures it remains lightweight yet robust, making it suitable for both home and office environments. The materials chosen emphasize durability and functionality, ensuring a smooth typing experience over time.

Aesthetics

The E-Yooso TKL keyboard offers a sleek and modern design with a focus on visual appeal. Its compact tenkeyless layout creates a clean look, while the RGB lighting enhances its aesthetic charm. The keyboard features customizable backlighting, allowing users to personalize their setup with vibrant colors and dynamic effects. The minimalist frame and elegant keycap design contribute to its sophisticated appearance, making it a stylish addition to any workspace. The overall design balances functionality with beauty, appealing to both gamers and professionals who value visual appeal.

Programmable Features

The E-Yooso TKL keyboard offers customizable key bindings and RGB lighting options, allowing users to tailor their typing and gaming experience to their preferences and needs.

Custom Key Bindings

The E-Yooso TKL keyboard allows users to redefine keys for personalized functionality. Through its intuitive software, you can assign complex macros, media controls, or frequently used shortcuts to any key. This feature enhances productivity for professionals and streamlines gameplay for enthusiasts. The ability to save multiple profiles ensures flexibility across different tasks, making it a versatile tool for both work and leisure activities without compromising on efficiency or performance.

RGB Lighting

The E-Yooso TKL keyboard features vibrant RGB lighting, offering a range of customizable color options and effects. Users can choose from pre-programmed lighting patterns or create their own using the software. The backlighting enhances both aesthetics and functionality, providing visibility in low-light environments. With adjustable brightness and dynamic effects, the RGB lighting adds a personal touch to the keyboard’s design, making it a stylish addition to any desktop setup while maintaining its professional appeal for work or gaming sessions.

The E-Yooso TKL Manual

The E-Yooso TKL manual provides comprehensive guidance for setting up, customizing, and troubleshooting the keyboard, ensuring users can maximize its programmable features and RGB lighting capabilities efficiently.

What’s Included

The E-Yooso TKL manual comes with the keyboard, USB-C cable, keycap puller, and switch puller. It also includes detailed documentation and optional accessories like additional keycaps and switches. The manual ensures users have everything needed to set up and customize their keyboard, providing a comprehensive guide for optimal performance and personalization. These components are thoughtfully packaged to enhance the overall user experience.

Setup Guide

Setting up the E-Yooso TKL keyboard is straightforward. Connect the keyboard via USB-C and download the manual from the official website for customization. The guide provides step-by-step instructions for programming keys, adjusting RGB lighting, and optimizing performance. It ensures a seamless setup experience, allowing users to tailor their keyboard to their preferences. Follow the manual’s directions carefully to unlock all features and functions, ensuring a smooth and personalized setup process;

Advanced Customization

The E-Yooso TKL manual offers detailed instructions for advanced customization. Users can remap keys, create custom profiles, and adjust RGB lighting effects. The manual explains how to use the built-in software to program macro keys, fine-tune backlighting, and synchronize effects. It also covers advanced features like N-key rollover and USB-C connectivity. With these tools, enthusiasts can tailor the keyboard to their specific needs, enhancing both functionality and aesthetics for a personalized typing experience.

Performance and Typing Experience

The E-Yooso TKL keyboard delivers smooth, responsive typing with its mechanical switches and durable keycaps. It offers a satisfying tactile feel and clear auditory feedback, enhancing productivity and comfort during extended use.

Switches and Keycaps

The E-Yooso TKL keyboard features mechanical switches that provide a smooth and tactile typing experience. The keycaps are designed for durability and comfort, offering a pleasant feel under the fingers. According to the manual, the switches are hot-swappable, allowing users to customize their typing experience by replacing them with different switch types. This feature is particularly appealing to enthusiasts who prefer a personalized feel. The keycaps are also interchangeable, enabling users to tailor their keyboard’s look and functionality to their preferences. Additionally, the keyboard comes with pre-lubed switches, which minimizes the need for manual lubrication and ensures a consistent typing experience right out of the box. The combination of high-quality switches and durable keycaps makes the E-Yooso TKL a reliable choice for both casual and heavy users. The manual emphasizes the importance of proper care and maintenance to extend the lifespan of these components, ensuring optimal performance over time. Overall, the switches and keycaps contribute significantly to the keyboard’s overall appeal and functionality, making it a versatile option for various users.

Typing Feel

The E-Yooso TKL keyboard offers a smooth and responsive typing experience, with mechanical switches providing clear tactile feedback. The pre-lubed switches ensure minimal friction, resulting in a quiet yet satisfying keystroke. The compact design allows for efficient typing, while the keycaps are contoured for comfort during extended use. The keyboard’s balanced actuation force makes it suitable for both gaming and productivity, delivering a consistent feel that enhances accuracy and speed. The typing feel is further enhanced by the keyboard’s ergonomic layout, which promotes natural hand placement and reduces fatigue.

Sound Profile

The E-Yooso TKL keyboard delivers a distinct sound profile, offering a clacky yet clear auditory experience. Its mechanical switches provide sharp feedback, making it ideal for both gaming and typing. The keyboard minimizes cavity noise, ensuring a quieter environment. With pre-lubed switches, the sound is smooth and consistent, reducing potential distractions. This balance of clarity and tactility makes it suitable for users seeking precise feedback without excessive noise, catering to both productivity and immersive gaming sessions.

Comparison with Other Keyboards

The E-Yooso TKL stands out for its balance of affordability, aesthetics, and functionality, competing closely with brands like Keychron and Royal Kludge in build quality and features.

Keychron vs E-Yooso

Keychron and E-Yooso TKL keyboards are both popular for their mechanical builds and customization options. Keychron offers a wider range of switch compatibility and wireless options, while E-Yooso focuses on affordability and sleek RGB aesthetics. Both cater to enthusiasts but differ in target audiences: Keychron appeals to premium seekers, whereas E-Yooso is favored for budget-friendly quality.

Royal Kludge vs E-Yooso

Royal Kludge and E-Yooso TKL keyboards cater to mechanical enthusiasts with distinct features. Royal Kludge offers wireless connectivity and a focus on portability, while E-Yooso emphasizes RGB lighting and programmability. Both are praised for their build quality, but Royal Kludge suits those needing wireless convenience, whereas E-Yooso appeals to gamers seeking vibrant aesthetics and customization options.

Pros and Cons

The E-Yooso TKL keyboard offers a compact, programmable design with vibrant RGB lighting and durable build quality. However, it lacks dedicated software and an aluminum plate.

Advantages

The E-Yooso TKL keyboard excels with its compact tenkeyless design, offering excellent portability and desk space efficiency. Its programmable keys and customizable RGB lighting enhance user experience, catering to both gamers and professionals. The keyboard’s robust build quality ensures durability, while its hot-swappable switches allow for easy customization. Additionally, the inclusion of a detachable USB-C cable provides convenient connectivity, making it a versatile option for various settings.

Limitations

The E-Yooso TKL keyboard lacks an aluminum plate, which some users find disappointing for a premium feel. Its sound profile can be clacky, potentially irritating for noise-sensitive environments. Additionally, the absence of dedicated software for customization may deter enthusiasts seeking advanced programming options. While these limitations exist, they don’t overshadow the keyboard’s overall value and performance for everyday use and gaming.

Maintenance and Upgrades

Regular cleaning with compressed air and a damp cloth prevents dust buildup. Switches and keycaps can be replaced for customization. Lubrication with oils like Krytox enhances smoothness.

Cleaning Tips

Regularly clean your E-Yooso TKL keyboard to maintain performance. Turn it upside down and shake gently to remove loose debris. Use compressed air to blow out dust from between keys. Dampen a cloth with water and gently wipe keys and surfaces, avoiding harsh chemicals. For tough stains, mix a small amount of mild soap with water. Avoid submerging the keyboard in liquid. Dry thoroughly before reconnecting. Lubricate switches with oils like Krytox for smoother operation. Clean keycaps by removing and soaking them in warm water with soap;

Switch and Keycap Replacement

Replacing switches and keycaps on the E-Yooso TKL is straightforward. For switches, remove the keycaps using a puller, then gently pry the switch from the PCB. Install new switches by aligning the pins and pressing firmly. For keycaps, simply pull them off and replace with compatible ones. Ensure keycaps are designed for mechanical switches. Lubricate stabilizers with Krytox oil for smoother typing. Test the keyboard after replacement to ensure all keys function properly.

Troubleshooting Common Issues

Common issues include sticky keys, connectivity problems, and clacky sounds. Clean keys with compressed air and damp cloths. Restart the keyboard or recheck USB connections for connectivity. Lubricate switches to reduce noise. For persistent issues, refer to the manual or contact support for assistance. Regular maintenance ensures optimal performance and longevity of the keyboard.

Fixing Sticky Keys

Sticky keys on the E-Yooso TKL can be resolved by cleaning the switches and keycaps. Use compressed air to remove dust and debris. Dampen a cloth with water or isopropyl alcohol and gently wipe the keys. Avoid harsh chemicals or submerging the keyboard in water. For mechanical switches, apply a small amount of switch lube to reduce friction. Ensure the keyboard is dry before reconnecting it to your device. Regular maintenance prevents sticky keys and ensures smooth operation.

Resolving Connectivity Problems

Connectivity issues with the E-Yooso TKL can often be fixed by checking the USB connection. Ensure the USB cable is securely plugged into both the keyboard and the computer. Try using a different USB port or a high-quality USB hub. Restart your device to reset the connection. If using a removable Type-C cable, verify it’s properly seated. Update or reinstall USB drivers if necessary. For persistent issues, consult the manual or contact customer support for troubleshooting assistance or potential warranty claims.

The E-Yooso TKL keyboard offers a blend of style, functionality, and customization, making it a great choice for both gamers and typists. Its compact design and programmable features provide a seamless typing experience, while the RGB lighting enhances its aesthetic appeal. With proper maintenance and troubleshooting, it delivers reliable performance. Whether for work or play, the E-Yooso TKL is a practical and stylish option for keyboard enthusiasts.

Final Thoughts

The E-Yooso TKL keyboard is a solid option for those seeking a compact, customizable mechanical keyboard. Its programmable features and RGB lighting cater to both functionality and aesthetics. While it may lack premium build materials like an aluminum plate, its performance and value make it a strong contender in the budget-friendly mechanical keyboard market. Users have praised its typing feel and sound profile, though some note a desire for dedicated software. Overall, it balances affordability with quality, appealing to enthusiasts and casual users alike.

Where to Buy

The E-Yooso TKL keyboard is available on popular online marketplaces such as Amazon, Newegg, and eBay. It can also be purchased directly from the E-Yooso official website, with occasional discounts during festivals like Black Friday. For enthusiasts, mechanical keyboard forums and communities often feature group buys or recommendations. Ensure to verify seller ratings and reviews before making a purchase to secure authenticity and warranty coverage, especially when buying from third-party sellers.

ge profile ice maker manual

GE Profile Ice Maker Manual: Overview

This manual provides a comprehensive guide for the GE Profile Ice Maker, covering installation, operation, maintenance, troubleshooting, and safety tips. It ensures optimal performance and longevity.

The GE Profile Ice Maker is a countertop nugget ice maker designed for convenience and high-quality ice production. It features a compact design, Bluetooth connectivity, and compatibility with the GE Profile Opal app for remote control. Ideal for homeowners and entertainers, it offers a unique way to produce fresh, chewable nugget ice at home, ensuring a perfect experience for any occasion.

1.2 Key Features of the GE Profile Ice Maker

The GE Profile Ice Maker offers a side tank for water supply, Bluetooth connectivity for app control, and high daily ice production. It also features a durable design, easy-to-use interface, and smart home integration. These features ensure efficient, convenient, and customizable ice production tailored to various household needs and preferences.

Model-Specific Guides

This section provides detailed instructions and specifications for specific GE Profile Ice Maker models, ensuring users can optimize their appliance’s performance and functionality according to its unique features.

2.1 GE Profile Opal Nugget Ice Maker (Model OPAL01GEPKT)

The GE Profile Opal Nugget Ice Maker (Model OPAL01GEPKT) is a compact, Bluetooth-enabled appliance designed for home use. It produces nugget-style ice and features a side water tank for convenience. The model is known for its efficient ice production and compatibility with the GE Profile Opal app for remote monitoring and scheduling. Regular cleaning and maintenance are essential for optimal performance, as outlined in the manual. This model is popular among users for its ease of use and high-quality ice output. Proper installation and setup are crucial to ensure longevity and efficiency.

2.2 GE Profile Opal 2.0 Nugget Ice Maker (Model XPIO13SCSS)

The GE Profile Opal 2.0 Nugget Ice Maker (Model XPIO13SCSS) is an advanced countertop appliance with a side water tank and 38-pound daily ice production. It features SmartHQ WiFi connectivity for remote control via the GE Profile Opal app. The manual provides detailed instructions for installation, maintenance, and troubleshooting, ensuring optimal performance and longevity. Its sleek design and high-efficiency operation make it a popular choice for home use.

Installation and Setup

Ensure proper placement on a level surface, unpack carefully, and connect the water supply. Follow step-by-step instructions for installation to guarantee efficient operation and longevity.

3.1 Unpacking and Placement Guidelines

When unpacking, handle the ice maker gently to avoid damage. Place it on a level, stable surface away from direct sunlight and moisture. Ensure adequate clearance around the unit for proper ventilation. Avoid placing it near heat sources or flammable materials. Proper placement ensures efficient operation and prevents potential hazards. Always follow the manufacturer’s guidelines for optimal setup and safety.

3.2 Step-by-Step Installation Instructions

Plug in the GE Profile Ice Maker and ensure it is properly grounded. Allow the unit to run a self-check cycle. Follow the manual’s specific instructions for your model, such as the OPAL01GEPKT or XPIO13SCSS, to complete the installation. Refer to the user manual for detailed guidance on connecting water supplies and final setup steps to ensure proper function and safety.

3.3 Leveling the Ice Maker for Proper Function

Proper leveling ensures optimal performance and prevents issues like uneven ice production or water leaks. Use a spirit level to check the unit’s balance. Adjust the leveling feet as needed until the ice maker is perfectly horizontal. Refer to your specific model’s manual, such as the OPAL01GEPKT or XPIO13SCSS, for precise leveling instructions to guarantee smooth operation and longevity.

Operating the GE Profile Ice Maker

Learn how to power up, make ice, and pair your ice maker with the GE Profile Opal app via Bluetooth for convenient monitoring and scheduling.

4.1 First-Time Use: Powering Up and Initial Setup

Start by unpacking and placing the ice maker on a stable surface. Plug in the device and ensure it’s level. Power it on and allow it to run a self-check. Follow the on-screen instructions to complete the initial setup, including filling the water reservoir and selecting your preferred ice settings for optimal performance.

4.2 Making Ice: A Comprehensive Guide

Filling the water reservoir is the first step. Select your desired ice size and type using the control panel. The machine will automatically start producing ice once the settings are confirmed. Monitor the process and ensure the reservoir isn’t empty. Regularly check the ice bin to avoid overflow and maintain efficiency.

4.3 Pairing with the GE Profile Opal App via Bluetooth

Open the GE Profile Opal app and enable Bluetooth on your device. Ensure the ice maker is in pairing mode. Follow the app’s instructions to complete the connection. Once paired, you can monitor ice production, schedule cycles, and receive notifications. This feature enhances convenience and allows remote control for seamless operation.

Maintenance and Cleaning

Regularly clean the ice bin with warm soapy water and rinse thoroughly. Wipe the water reservoir with a damp sponge. Descale every 3-6 months for optimal performance.

5.1 Cleaning the Ice Bin and Water Reservoir

Remove the ice bin and wash it with warm, soapy water. Rinse thoroughly to ensure no soap residue remains. Use a damp sponge to clean the water reservoir, avoiding harsh chemicals. Regular cleaning prevents mineral buildup and maintains hygiene, ensuring fresh-tasting ice and optimal machine performance over time. This process is essential for longevity.

5.2 Regular Maintenance Tips for Optimal Performance

Regularly clean the ice bin and water reservoir to prevent mineral buildup and bacteria growth. Check for scale buildup and descale if necessary. Ensure proper water flow and filter maintenance. Replace the water filter every six months to maintain water quality. Run cleaning cycles as recommended to keep the system functioning efficiently and producing fresh, clean ice consistently.

5.3 Replacing the Water Filter

Replace the water filter every six months to ensure clean ice production. Locate the filter, turn off water supply, and remove the old filter; Insert the new GE Profile Opal water filter, available at geappliances.com, and hand-tighten. Flush the system by running a cleaning cycle to clear any debris. Reset the filter indicator as instructed in the manual.

Troubleshooting Common Issues

Diagnose common problems like ice not forming or machine noise. Check error codes in the manual for solutions. Ensure proper water supply and leveling for smooth operation.

6.1 Diagnosing and Resolving Common Problems

Identify issues by error codes or symptoms. Check water supply, power, and drain connections. Clean clogged water filters or ice bins. Level the machine to ensure proper function. Refer to the manual for specific solutions. Regular maintenance prevents issues and extends appliance life. Troubleshooting ensures optimal performance and ice production efficiency.

6.2 Understanding Error Codes and Solutions

The manual lists common error codes like E1 (water supply issue) or E2 (low water level). Solutions include checking the water supply, ensuring proper connections, and cleaning filters. Refer to the manual for specific error code meanings and step-by-step fixes to restore functionality. Understanding these codes helps troubleshoot efficiently, preventing downtime and ensuring continuous ice production.

GE Profile Ice Maker Specifications

The GE Profile Ice Maker features models like OPAL01GEPKT and XPIO13SCSS, producing up to 38 pounds of ice daily. It includes Bluetooth connectivity, side tanks, and compatibility with GE water filters for optimal performance and convenience.

7.1 Technical Details and Capabilities

The GE Profile Ice Makers, such as the OPAL01GEPKT and XPIO13SCSS, are designed to produce up to 38 pounds of nugget ice daily. They feature built-in Bluetooth connectivity, side water tanks, and compatibility with GE water filters. These models also include advanced sensors for smart operation, ensuring efficient and high-quality ice production tailored to user preferences through the GE Profile Opal app.

Using the GE Profile Opal App

The GE Profile Opal app allows users to monitor their ice maker’s status, schedule ice production, and receive notifications. It enhances convenience and customization for seamless operation.

8.1 Features and Benefits of the App

The GE Profile Opal app offers seamless integration with your ice maker, allowing you to monitor production, schedule ice-making, and receive notifications. It provides remote control, customizable settings, and real-time updates, ensuring convenience and efficiency. The app also offers troubleshooting guides and maintenance reminders, enhancing your overall experience and prolonging the appliance’s lifespan.

8.2 Monitoring and Scheduling Ice Production

The GE Profile Opal app enables users to monitor and schedule ice production remotely. Through the app, you can check the current status of your ice maker, set production times, and adjust settings based on your needs. Receive notifications when the ice bin is full or when maintenance is required. This feature ensures efficient ice management and convenience for users.

Safety Precautions and Best Practices

  • Always read the manual before first use to ensure safe operation.
  • Avoid exposing the ice maker to extreme temperatures or moisture.
  • Never use hot water, as it may damage the unit.
  • Keep children away from the ice maker while in operation.
  • Regularly clean and maintain the unit to prevent mold growth.
  • Ensure proper ventilation around the ice maker for efficient performance.

9.1 Essential Safety Instructions

Read the manual thoroughly before operation. Ensure the ice maker is placed on a stable, level surface away from direct sunlight and moisture. Avoid exposing it to extreme temperatures. Keep children away during operation. Never use hot water, as it may damage components. Regular cleaning and proper installation are crucial. Always unplug during cleaning or maintenance. Follow all safety guidelines to ensure longevity and safe operation.

9.2 Best Practices for Longevity and Efficiency

Regularly clean the ice maker and water reservoir to prevent mineral buildup. Use only compatible water filters to ensure clean water flow. Maintain proper water levels and avoid overfilling. Dry the exterior periodically to prevent rust. Store the unit in a dry place during extended periods of inactivity. Refer to the manual for specific care tips to maintain efficiency and extend lifespan.

Accessories and Additional Resources

Explore compatible water filters, replacement parts, and the GE Profile Opal app for enhanced functionality. Visit geappliances.com for genuine accessories and additional support resources.

10.1 Compatible Water Filters and Replacement Parts

The GE Profile Opal water filter is specifically designed for the Opal ice makers and is available at geappliances.com. Ensure authenticity and compatibility by purchasing genuine GE parts. Regularly replacing the water filter improves ice quality and machine performance; Additional accessories, like side tanks and Bluetooth modules, can enhance functionality. Always use GE-approved products for optimal results and longevity.

10.2 Where to Find Additional Support and Manuals

For additional support and manuals, visit the official GE Appliances website or access your GE Appliances Account. Manuals for registered products are available online. You can also download the GE Profile Opal app for troubleshooting guides and maintenance tips. Visit geappliances.com or platforms like ManualsLib for comprehensive resources and model-specific instructions.

louisiana commercial driver’s license manual

The Louisiana CDL Manual is your essential guide to obtaining and maintaining a Commercial Driver’s License. It outlines licensing requirements, safe driving practices, and specific regulations for operating commercial vehicles in Louisiana. Updated regularly, it ensures compliance with state and federal laws, helping drivers prepare for exams and endorsements efficiently. Download the latest version to stay informed and drive confidently.

Overview of the CDL Manual

The Louisiana Commercial Driver’s License (CDL) Manual is a comprehensive guide designed to help individuals prepare for the CDL exam and understand the rules and regulations for operating commercial vehicles in Louisiana. The manual is divided into several sections, each addressing key aspects of commercial driving, such as road safety, traffic laws, and vehicle operation. It covers the three main classes of CDLs—Class A, B, and C—and provides detailed information on endorsements and restrictions. The manual is updated annually to reflect changes in state and federal regulations, ensuring drivers stay compliant. Additionally, it includes sections on pre-trip inspections, cargo securement, and hazardous materials transportation. The manual is available in PDF format for easy access and serves as an essential resource for both new and experienced drivers. By studying the manual, drivers can gain the knowledge needed to pass the CDL exam and operate commercial vehicles safely and efficiently.

Importance of the CDL Manual for Commercial Drivers

The Louisiana CDL Manual is an indispensable resource for commercial drivers, providing critical information necessary for safe and legal operation of commercial vehicles. It serves as a primary study guide for the CDL exam, ensuring drivers understand state and federal regulations, traffic laws, and safety protocols. The manual emphasizes the importance of adhering to these guidelines to prevent accidents and violations. By studying the manual, drivers can gain a thorough understanding of their responsibilities, including pre-trip inspections, cargo handling, and hazard awareness. Additionally, it helps drivers stay updated on any changes in laws or procedures, ensuring compliance and reducing risks on the road. For both new and experienced drivers, the CDL Manual is a vital tool for maintaining professionalism, promoting road safety, and contributing to the efficient operation of commercial vehicles in Louisiana.

Eligibility Criteria for Obtaining a CDL in Louisiana

To qualify for a CDL in Louisiana, applicants must meet specific requirements, including passing a medical exam, completing a vision test, and providing proof of identity and residency. Additional documentation may be needed.

Age Requirements

In Louisiana, the minimum age to apply for a Commercial Driver’s License (CDL) is 18 years old for intrastate driving (within state borders). However, to operate a commercial vehicle across state lines (interstate driving), federal regulations require drivers to be at least 21 years old. This ensures that CDL holders meet both state and federal standards for commercial driving. Additionally, drivers under the age of 21 are prohibited from transporting hazardous materials or operating vehicles requiring a hazardous materials endorsement. These age requirements are strictly enforced to maintain safety on public roads and comply with federal guidelines. Applicants must provide proof of age, such as a valid birth certificate or passport, when submitting their CDL application. By adhering to these age requirements, Louisiana ensures that commercial drivers are both experienced and prepared for the responsibilities of operating large vehicles.

Residency and Medical Requirements

To obtain a Commercial Driver’s License (CDL) in Louisiana, applicants must meet specific residency and medical requirements. Residency is established by providing proof of domicile, such as a valid Louisiana driver’s license, utility bills, or other government-issued documents. Applicants must also be a Louisiana resident to apply for a CDL within the state.

Medical requirements are critical for ensuring driver safety. Applicants must undergo a physical examination by a Federal Motor Carrier Safety Administration (FMCSA)-certified Medical Examiner. A valid Medical Examiner’s Certificate must be submitted with the CDL application. Drivers with certain medical conditions may be restricted from operating commercial vehicles or require additional documentation. These requirements help maintain road safety and compliance with federal regulations. By meeting these standards, applicants demonstrate their eligibility to operate commercial vehicles responsibly in Louisiana.

Classes of Commercial Drivers Licenses in Louisiana

Louisiana offers Class A, B, and C CDLs, each catering to different types of commercial vehicles and cargo. These classifications determine the specific requirements and restrictions for operating various commercial vehicles within the state.

Class A, B, and C Licenses Explained

In Louisiana, the Commercial Driver’s License (CDL) is categorized into three primary classes: Class A, Class B, and Class C. Each class is designed for specific types of vehicles and cargo, ensuring drivers are qualified to operate them safely. A Class A CDL is required for combination vehicles with a trailer in tow, such as semi-trucks, where the combined weight exceeds 26,001 pounds. Class B CDLs are for heavy straight trucks, like dump trucks or box trucks, also over 26,001 pounds. Class C CDLs are reserved for smaller vehicles, including passenger buses and HazMat transports, typically under 26,001 pounds but requiring special endorsements. Understanding these classifications is crucial for choosing the correct license and endorsements, as outlined in the Louisiana CDL manual. Proper licensing ensures compliance with state and federal regulations, promoting road safety and efficient commercial operations.

Study Materials for the CDL Exam

The official Louisiana CDL manual is the primary study resource, offering detailed info on commercial driving laws, safety practices, and exam requirements. Additional online resources, including practice tests, are available to aid preparation.

Official Louisiana CDL Manual

The official Louisiana CDL manual is the primary study resource for commercial drivers seeking to obtain or renew their license. Available as a free PDF download, it provides comprehensive information on state-specific regulations, safety guidelines, and exam preparation. The manual is regularly updated to reflect current laws and industry standards, ensuring drivers have the most accurate and relevant information. It covers essential topics such as road safety, vehicle inspection procedures, and endorsements for specialized cargo like hazardous materials. Additionally, it includes detailed sections on the different classes of CDLs (A, B, and C) and the requirements for each. The manual is designed to be user-friendly, with clear explanations and practical examples to help drivers prepare for both the written and practical exams. It is accessible online through the Louisiana OMV website, making it convenient for drivers to study at their own pace. By using the official manual, drivers can ensure they are well-prepared for the challenges of commercial driving in Louisiana.

Additional Online Resources and Practice Tests

Supplement your studies with additional online resources and practice tests designed to help you master the Louisiana CDL manual. Interactive study guides and practice exams are available to simulate real test conditions, ensuring you’re well-prepared for both the written and practical portions of the CDL exam. Many websites offer tailored support, such as AI-powered chat assistance and audio learning tools, allowing you to study on the go. These resources often include detailed explanations of correct and incorrect answers, helping you understand and improve your knowledge gaps. Practice tests cover a wide range of topics, from road safety and vehicle inspection procedures to endorsements for hazardous materials and combination vehicles. By utilizing these online tools, you can reinforce your understanding of the official manual and gain confidence in your ability to pass the CDL exam. Visit the Louisiana OMV website or reputable third-party platforms to access these valuable study aids and enhance your preparation.

briggs and stratton motor manual

Briggs and Stratton motor manuals are essential guides for operation, maintenance, and repair. They provide detailed instructions to ensure optimal performance and longevity of your engine.

Overview of Briggs and Stratton Engines

Briggs and Stratton engines are widely used in outdoor power equipment, including lawn mowers, snow blowers, and generators. Known for their reliability and durability, these engines are designed to deliver consistent performance under various conditions. With a range of models available, they cater to both residential and commercial needs. Their commitment to innovation and quality has made them a trusted choice for engine power solutions globally.

Importance of Using the Correct Manual

Using the correct Briggs and Stratton manual is crucial for ensuring proper operation, maintenance, and repair of your engine. It provides specific instructions tailored to your engine model, helping you avoid costly mistakes and potential safety hazards. The manual ensures compliance with manufacturer guidelines, optimizing performance and extending the engine’s lifespan. Always refer to the correct manual for your model to maintain reliability and efficiency.

How to Find Your Briggs and Stratton Manual

To find your Briggs and Stratton manual, identify your engine’s model number and use the official lookup tool on their website. Enter the number to download the specific guide.

Using the Model Number for Manual Lookup

Locate your Briggs and Stratton engine’s model number, typically stamped on the engine itself, near the oil fill or on a sticker. Use this number to access the correct manual via the official lookup tool on their website. Enter the model number to quickly download the specific guide, ensuring accurate maintenance, repair, and operation instructions tailored to your engine.

Search Tools and Resources for Manuals

Briggs and Stratton provides user-friendly tools to find engine manuals. Use their official website or platforms like ManualsLib to search by model number. Additionally, the Briggs and Stratton Assist feature helps locate parts and manuals efficiently. These resources ensure quick access to the correct documentation, saving time and effort for maintenance, repair, or operation needs.

Understanding Briggs and Stratton Model Numbers

Briggs and Stratton engines feature unique model, type, and code numbers stamped directly into the engine. These numbers help identify specific engines and ensure accurate manual selection for maintenance or repairs, making them essential for proper operation and troubleshooting.

Locating the Model, Type, and Code Numbers

The model, type, and code numbers on Briggs and Stratton engines are typically stamped directly into the engine block or on a metal plate. These numbers are crucial for identifying your engine and ensuring you use the correct manual or parts. They are usually found near the engine block, often on a sticker or engraved into the metal. Cleaning the area may be necessary to clearly read the numbers, which are essential for accurate maintenance and repair.

Interpreting Model Number Formats

Briggs and Stratton model numbers follow a specific format, typically consisting of letters and numbers that provide detailed information about the engine. The format often includes codes for horsepower, displacement, and special features. Understanding this structure helps in identifying the correct manual or parts for your engine. For example, the model number may start with a series identifier, followed by numbers indicating power and configuration. This coding system ensures accurate lookup and maintenance.

Maintenance and Repair Guidance

Regular maintenance is crucial for extending engine life. The manual provides scheduled maintenance recommendations, oil change guidelines, and storage tips to ensure optimal performance and reliability of your Briggs and Stratton engine.

Scheduled Maintenance Recommendations

Briggs and Stratton manuals outline routine maintenance tasks to ensure engine longevity. Regular oil changes, air filter cleaning, and spark plug inspections are emphasized. The manual provides timelines for these services, helping users avoid premature wear. By following these recommendations, engine performance and reliability are maintained, reducing the risk of unexpected breakdowns and extending the lifespan of the engine.

Oil Change and Lubrication Guidelines

Briggs and Stratton manuals provide detailed oil change and lubrication schedules to ensure proper engine function; Typically, oil changes are recommended every 25 hours of use or annually. Use of the correct viscosity, such as SAE 30 or 5W-30, is crucial for optimal performance. The manual also outlines steps for draining old oil safely and refilling with the appropriate lubricant. Proper lubrication extends engine life and prevents overheating.

Storage and Winterization Tips

Proper winter storage of your Briggs and Stratton engine is vital to prevent damage. Drain old oil and replace it with fresh oil of the recommended viscosity. Add a fuel stabilizer to the gas tank to prevent degradation. Clean the engine thoroughly and store it in a dry, protected area. Use a breathable cover to avoid moisture buildup. Always follow the manual’s specific winterization steps for optimal preservation.

Troubleshooting Common Issues

Troubleshooting common issues begins with diagnosing problems like faulty ignitions or carburetors. Refer to the manual for repair steps and maintenance tips to ensure smooth engine operation.

Diagnosing Engine Problems

Diagnosing engine problems begins with identifying symptoms such as poor starting, rough running, or loss of power. Refer to your Briggs and Stratton manual for troubleshooting guides tailored to your engine model. Common issues include ignition problems, carburetor malfunctions, or fuel system blockages. Use the manual’s diagnostic charts to isolate faults and determine necessary repairs. Always follow safety precautions when inspecting or testing engine components to ensure accurate diagnoses and effective solutions.

Fixing Issues with Manual Choke/Primer Systems

Manual choke and primer systems require proper operation to ensure reliable engine starting. If issues arise, check for blockages in the fuel line or primer bulb. Ensure the primer is pressed the recommended number of times. Clean or replace the air filter and carburetor if clogged. Refer to your Briggs and Stratton manual for specific priming procedures and troubleshooting steps. Always follow safety guidelines when servicing these components to restore functionality and performance.

Parts Lookup and Ordering

Identify your engine’s model number for accurate parts lookup. Use Briggs and Stratton Assist to find part numbers, check availability, and order online with ease.

Using Briggs and Stratton Assist for Parts

Briggs and Stratton Assist is a powerful tool for identifying and ordering engine parts. By entering your engine’s model number, you can access detailed parts lists and diagrams. This system ensures accurate part identification, streamlining the repair process. With real-time availability checks and secure online ordering, it simplifies maintaining or repairing your engine. Use Briggs and Stratton Assist to save time and ensure you get the correct parts every time.

Availability and Pricing Information

Briggs and Stratton provides easy access to availability and pricing information for engine parts. Users can check real-time availability and pricing on their official website or through authorized dealers. By entering the engine’s model number, customers can quickly find the correct parts and their current pricing. Briggs & Stratton Assist also offers detailed parts lists and pricing, ensuring transparency and helping users make informed purchasing decisions;

Safety Precautions and Guidelines

Safety precautions are crucial when working with Briggs and Stratton engines. Always wear protective gear, follow manual guidelines, and use correct tools. Ensure a safe workspace and properly ventilated area to prevent accidents and ensure safe engine operation.

Operating Safety Tips

Always wear protective gear such as gloves and safety glasses when operating or servicing your Briggs and Stratton engine. Ensure the workspace is well-ventilated to avoid inhaling harmful fumes. Follow the manual’s instructions for proper engine operation and avoid wearing loose clothing that could get caught in moving parts. Keep children and pets away from the engine during operation. Regularly inspect the engine for damage or wear to prevent accidents. Always refer to your Briggs and Stratton manual for specific safety guidelines tailored to your engine model.

Handling Engine Parts and Tools Safely

Always use proper tools designed for your Briggs and Stratton engine to avoid damage or injury. Ensure all parts are securely fastened before operation. Wear gloves and goggles when handling sharp or heavy components; Keep the workspace clean and well-lit to prevent accidents. Never leave tools or parts unattended, especially near children. Refer to your Briggs and Stratton manual for specific handling guidelines and torque specifications to ensure safety and engine longevity.

Briggs and Stratton vs. Other Engine Brands

Briggs and Stratton engines are known for their reliability and affordability, while brands like Honda offer superior engineering and durability. Briggs and Stratton remains a top choice for many users due to its widespread support and resources.

Comparison with Honda Engines

Honda engines are often praised for their superior engineering and durability, making them a top choice for heavy-duty applications. Briggs and Stratton, while more affordable and widely available, may lack the same level of long-term reliability. However, their extensive support network and ease of maintenance make them a practical option for many users. Both brands cater to different needs, with Honda focusing on premium performance and Briggs and Stratton on accessibility and value.

Quality and Engineering Differences

Honda engines are renowned for their advanced engineering and reliability, often outperforming Briggs and Stratton in long-term durability. Briggs and Stratton engines, however, are known for their robust build and ease of maintenance, making them a reliable choice for everyday use. While Honda focuses on innovative technology, Briggs and Stratton emphasizes affordability and accessibility, ensuring their engines remain a practical option for many users.

Common Briggs and Stratton Engine Issues

Common issues include starting problems, manual choke malfunctions, and fuel inefficiency. These problems often arise from improper maintenance or wear and tear over time.

Known Problems and Solutions

Common issues with Briggs and Stratton engines include starting difficulties, manual choke malfunctions, and fuel inefficiency. These problems often stem from improper maintenance or worn-out parts. Solutions involve cleaning or replacing the air filter, checking fuel lines, and ensuring proper lubrication. Regular servicing and adhering to the manual’s guidelines can prevent these issues and extend engine lifespan. Always refer to your manual for specific diagnostic and repair steps.

User Feedback and Reviews

Users praise Briggs and Stratton manuals for their clarity and detail, aiding in troubleshooting and maintenance. Many highlight the reliability and performance of the engines, though some note starting issues and choke problems. Comparisons with Honda engines often emphasize differences in build quality. Overall, users appreciate the comprehensive guidance provided, even as they occasionally find complex repairs challenging without professional assistance.

Emissions and Environmental Standards

Briggs and Stratton engines incorporate emission control technologies to meet strict environmental regulations, ensuring eco-friendly performance while maintaining powerful operation for outdoor power equipment and generators.

Emission Control Technologies

Briggs and Stratton engines utilize advanced emission control technologies to minimize environmental impact. These include catalytic converters, improved fuel injection systems, and optimized combustion chamber designs. Such innovations reduce emissions of CO, HC, and NOx, ensuring compliance with EPA and CARB standards. These technologies enhance fuel efficiency while maintaining powerful performance, making them environmentally friendly for outdoor power equipment and generators.

Compliance with Environmental Regulations

Briggs and Stratton engines are designed to meet stringent environmental regulations, including EPA and CARB standards. By incorporating advanced emission control technologies, these engines minimize ecological impact while maintaining performance. Compliance ensures reduced emissions and eco-friendly operation, aligning with global sustainability goals. This commitment to environmental standards makes Briggs and Stratton engines a reliable choice for users seeking green and efficient power solutions.

Future Trends in Briggs and Stratton Engines

Briggs and Stratton engines are advancing with innovative technologies, focusing on cleaner combustion systems and smart engine management. These trends aim to enhance efficiency, reduce emissions, and promote eco-friendly solutions.

Advancements in Engine Technology

Briggs and Stratton engines are embracing cutting-edge advancements, including emission control technologies and eco-friendly innovations. Enhanced fuel efficiency, reduced emissions, and quieter operation are key focuses. Digital integration, such as smart engine management systems, improves performance and diagnostics. These technologies ensure compliance with environmental regulations while delivering reliable power for various applications, from lawn mowers to generators.

Sustainability and Eco-Friendly Innovations

Briggs and Stratton is committed to sustainability through eco-friendly engine designs. Their engines feature emission control technologies to reduce environmental impact. Enhanced fuel efficiency and lower emissions ensure compliance with environmental regulations. Additionally, the use of recyclable materials in engine construction promotes greener manufacturing practices. These innovations support a cleaner environment while maintaining reliable performance for outdoor power equipment and generators.

Briggs and Stratton motor manuals are invaluable for proper care and maintenance of your engine. Always consult your manual to ensure optimal performance and longevity.

Stay updated with Briggs and Stratton for the latest innovations and support to keep your engine running at its peak performance.

Final Tips for Manual Usage

Always thoroughly read your Briggs and Stratton manual before starting any task. Reference the model number to ensure accuracy and avoid errors. Follow the maintenance schedule to extend engine life. Use genuine parts for repairs to maintain performance and warranty. Keep the manual handy for quick troubleshooting. Regularly update your knowledge with the latest guides from Briggs and Stratton for optimal results.

Staying Updated with Briggs and Stratton

Stay informed with the latest updates from Briggs and Stratton by visiting their official website or subscribing to their newsletters. Regularly check for new manual releases, technical updates, and product improvements. Utilize the Briggs & Stratton Assist tool for parts lookup and troubleshooting. Follow their social media channels for tips, maintenance reminders, and updates on new technologies. This ensures you always have the most accurate information for your engine.

wrx735sdhz manual

This manual provides essential guidance for understanding and operating the Whirlpool WRX735SDHZ refrigerator. It covers installation, features, and troubleshooting to ensure optimal performance and user satisfaction.

Overview of the WRX735SDHZ Refrigerator Model

The Whirlpool WRX735SDHZ is a high-capacity side-by-side refrigerator designed for efficient storage and advanced cooling. It features a sleek design with a large interior space, ideal for families. The model includes a water and ice dispenser, LED lighting, and a door alarm for convenience. With its Energy Star certification, it ensures energy efficiency while maintaining optimal temperatures. This refrigerator is equipped with modern technology, including a user-friendly control panel and diagnostic modes for troubleshooting. It is a reliable choice for homeowners seeking a durable and feature-rich appliance. Proper installation and regular maintenance are key to maximizing its performance and longevity.

Importance of Reading the Manual Before Use

Reading the Whirlpool WRX735SDHZ manual is crucial for safe and effective operation. It provides detailed instructions for installation, setup, and maintenance, ensuring the appliance functions optimally. The manual highlights safety precautions, such as proper electrical connections and handling of refrigerants. Understanding the features, like the LED lighting system and door alarms, enhances user experience. Troubleshooting guides help address common issues quickly, reducing downtime. Ignoring the manual may lead to improper usage, potentially voiding the warranty or causing damage. By following the manual, users can maximize efficiency, prolong the appliance’s lifespan, and enjoy all its advanced features. It’s a key resource for both new and experienced users.

Navigating the Manual Structure

The Whirlpool WRX735SDHZ manual is organized into clear sections for easy navigation. It begins with an introduction, followed by installation guidelines, feature explanations, control panel details, and maintenance tips. Each section is labeled with headings and subheadings, making it simple to locate specific information. The manual includes diagrams and illustrations to assist with complex tasks, such as troubleshooting or replacing parts. A comprehensive table of contents and index allow users to quickly find relevant topics. By following the manual’s logical structure, users can efficiently access the information they need, ensuring a smooth and hassle-free experience with their refrigerator.

Installation and Setup Guidelines

Proper installation ensures optimal performance. Level the refrigerator, connect water supply, and plug into a grounded outlet. Follow manual instructions for precise setup and alignment.

Pre-Installation Requirements

Before installing your Whirlpool WRX735SDHZ, ensure the space meets specific criteria. Check door clearance, floor leveling, and electrical connections. The area must be well-ventilated and clear of obstructions. Measure the doorway to ensure smooth passage. Unpack the refrigerator carefully, avoiding damage to components. Ensure a water supply line is accessible for the ice and water dispenser. Verify that the electrical outlet matches the appliance’s requirements. Proper preparation ensures a seamless installation process and prevents potential issues during operation. Refer to the manual for detailed specifications and guidelines to meet all pre-installation needs effectively.

Step-by-Step Installation Process

Begin by positioning the refrigerator in its designated space, ensuring it’s level and stable. Connect the water supply line to the designated inlet valve, securing it tightly to prevent leaks. Plug the appliance into a grounded electrical outlet, adhering to the manual’s voltage requirements. Align the doors properly and adjust hinges if necessary for even closure. Test the water and ice dispensers to ensure functionality. Finally, set the temperature controls and allow the unit to cool for 24 hours before stocking. Follow each step meticulously to ensure a successful installation and optimal performance of your Whirlpool WRX735SDHZ refrigerator.

Initial Setup and Configuration

After installation, configure your Whirlpool WRX735SDHZ by adjusting temperature settings to your preference using the control panel. Ensure the water supply line is securely connected and functioning properly. Activate the ice maker if desired, following the manual’s instructions. Set the date and time on the digital display for accurate temperature monitoring. Allow the refrigerator to cool for 24 hours before storing food to ensure optimal performance. Refer to the control panel section for detailed guidance on customizing settings to suit your needs. Proper initial setup ensures efficient operation and longevity of your appliance.

Features and Components of the WRX735SDHZ

The Whirlpool WRX735SDHZ features advanced LED lighting, door alarms, and a water and ice dispenser for enhanced convenience and energy efficiency.

Advanced LED Lighting System

The Whirlpool WRX735SDHZ features an advanced LED lighting system designed to provide bright, energy-efficient illumination inside the refrigerator. This system ensures optimal visibility, helping you easily locate items without wasting energy. The LED lights are strategically placed to create even lighting throughout the interior, reducing shadows and enhancing the overall user experience. Additionally, the LEDs are designed to be long-lasting and require minimal maintenance, offering both convenience and cost savings. The slim profile of these lights also contributes to a sleek, modern design, making the refrigerator both functional and visually appealing. This feature is a key highlight of the WRX735SDHZ model, emphasizing Whirlpool’s commitment to innovative and energy-conscious solutions.

Door Alarm and Notification Features

The Whirlpool WRX735SDHZ is equipped with a door alarm and notification system designed to alert users of specific conditions. The door alarm sounds if the refrigerator or freezer door is left open for an extended period, helping to prevent temperature fluctuations and food spoilage. This feature ensures energy efficiency and maintains optimal cooling performance. Additionally, the notification system provides audible alerts for issues such as high or low temperatures, ice maker problems, or water filter replacements. These alerts are programmable and customizable, allowing users to stay informed about their appliance’s status. The system is user-friendly and enhances overall convenience, ensuring your refrigerator operates smoothly and efficiently.

Water and Ice Dispenser Functionality

The Whirlpool WRX735SDHZ features an advanced water and ice dispenser, offering convenient access to fresh water and ice without opening the door. The dispenser is designed for easy use, with intuitive controls located on the door panel. It provides cubed ice, crushed ice, and chilled water options, catering to various needs. Regular maintenance, such as replacing the water filter and cleaning the dispenser area, ensures optimal performance. The system includes sensors to detect issues like low water pressure or ice jams, alerting users through the control panel. Troubleshooting common problems, like ice not dispensing, can often be resolved by checking the ice maker settings or ensuring the water supply is connected properly.

Understanding the Control Panel

Learn to navigate the WRX735SDHZ control panel, which simplifies managing your refrigerator’s settings. Icons and buttons provide easy access to temperature adjustments, ice, and water functions, ensuring seamless operation.

Control Panel Layout and Buttons

The WRX735SDHZ control panel is centrally located for easy access, featuring a user-friendly layout. It includes a power button, temperature adjustment keys, and mode selection buttons. The panel also has indicators for ice, water, and door status. Buttons are clearly labeled, ensuring intuitive operation. The display screen provides real-time updates on settings and notifications. Touch-sensitive controls allow for precise adjustments. Dedicated buttons for ice and water dispensers simplify operation. LED indicators highlight active modes and alert you to issues like open doors or low water pressure. This design ensures seamless interaction and efficient management of your refrigerator’s functions, making daily use straightforward and convenient.

Adjusting Temperature and Settings

Adjusting the temperature and settings on your Whirlpool WRX735SDHZ is straightforward using the control panel. Press the Settings button to access various options. Use the + or ⎻ buttons to increase or decrease the temperature. The refrigerator and freezer temperatures can be adjusted independently. Select Fast Cool for quick cooling or Ice Boost for increased ice production. After making changes, press Save to confirm. The display will show the updated settings. Ensure the doors are closed properly for optimal performance. Allow a few hours for the temperatures to stabilize. Refer to the manual for specific temperature recommendations and additional customization options. Regular adjustments ensure efficient operation and food freshness. Always verify settings after power outages or vacations.

Using the Display for Monitoring

The Whirlpool WRX735SDHZ features a user-friendly display that allows real-time monitoring of your refrigerator’s status. The display shows the current temperature settings for both the fridge and freezer. It also indicates when ice is being made or if the water filter needs replacement. Use the display to monitor the door status, ensuring they are properly closed. The screen will alert you with notifications, such as temperature deviations or power outages. Press the Display button to cycle through different monitoring modes. This feature helps maintain optimal conditions and ensures your refrigerator operates efficiently. Refer to the manual for detailed guidance on interpreting display messages and customizing settings for your needs. Regular monitoring ensures consistent performance and food freshness. Always check the display after making adjustments or during troubleshooting scenarios. The display is a vital tool for maintaining your appliance’s health and functionality. By staying informed, you can address issues promptly and enjoy uninterrupted service. The Whirlpool WRX735SDHZ display is designed to provide clarity and convenience, making it easier to manage your refrigerator’s operations effectively.

Maintenance and Troubleshooting

Regular maintenance ensures optimal performance. Clean vents and check door seals. Troubleshoot common issues like ice buildup or dispenser malfunctions. Refer to the manual for diagnostic guidance and solutions.

Regular Maintenance Tips

Regular maintenance is crucial for the longevity and efficiency of your Whirlpool WRX735SDHZ refrigerator. Start by cleaning the condenser coils every six months to ensure proper airflow and prevent overheating. Next, inspect and replace the water filter every 6-12 months to maintain water quality and ice production. Additionally, check door seals for any signs of wear or damage, as compromised seals can lead to energy loss and temperature fluctuations. Finally, wipe down the interior shelves and walls monthly to prevent mold and bacteria growth. Following these tips ensures optimal performance and reduces the risk of repairs.

Diagnostic Modes and Error Messages

The Whirlpool WRX735SDHZ features advanced diagnostic modes to help identify issues. When an error occurs, the display will show specific codes like EC or ER, indicating problems such as faulty sensors or communication errors. To access diagnostic mode, press and hold the Temperature and Ice Type buttons simultaneously for five seconds. This mode displays detailed error codes, guiding you to potential causes. Refer to the manual for a list of codes and solutions. If issues persist, contact a certified technician. Regular checks and timely repairs ensure uninterrupted appliance operation and prevent further damage, keeping your refrigerator running efficiently.

Common Issues and Solutions

Common issues with the Whirlpool WRX735SDHZ include the ice maker not producing ice, water dispenser malfunctions, and error codes like EC or ER. For ice issues, check the water supply line for kinks or blockages and ensure the ice maker is turned on. If the water dispenser isn’t working, verify the water filter is clean or replaced. Error codes often indicate sensor or communication problems. Refer to the manual for specific code meanings. Regularly cleaning the condenser coils and checking door seals can prevent many issues. If problems persist, resetting the refrigerator by unplugging it for 30 seconds may resolve minor glitches. Always consult the manual or contact a technician for complex repairs.

For further assistance, refer to the official Whirlpool website or contact customer support. Additional resources and troubleshooting guides are available online to enhance your user experience.

Final Checks and Best Practices

After completing the setup and understanding the features, perform a final check to ensure all settings are correct. Verify that the doors seal properly, the water supply is connected, and the drain is clear. Regularly clean the condenser coils to maintain efficiency and check the door seals for wear. Schedule periodic maintenance to ensure optimal performance. For energy savings, adjust temperature settings wisely and avoid overloading shelves. Consult the manual for specific care tips and adhere to safety guidelines. By following these practices, you’ll extend the lifespan of your refrigerator and enjoy reliable performance for years to come.

Where to Find Additional Help

If you encounter issues or have questions beyond this manual, Whirlpool offers various resources. Visit their official website for downloadable manuals, troubleshooting guides, and FAQs. For personalized assistance, contact Whirlpool’s customer support via phone or live chat. Additionally, authorized service centers can provide professional help for complex problems. Online forums and community discussions often feature solutions from other WRX735SDHZ users. Lastly, the appliance’s diagnostic mode can help identify errors, guiding you toward specific solutions. Utilize these resources to resolve issues efficiently and ensure your refrigerator operates at its best.

ground assault front bike suspension owners manual pdf download

The Ground Assault Front Bike Suspension is a game-changer in mountain biking, offering enhanced performance. This manual provides comprehensive insights, helping riders optimize suspension setup, maintenance, and safety effectively always.

1.1 Overview of the Ground Assault Front Bike Suspension

The Ground Assault Front Bike Suspension is a high-performance component designed to enhance mountain biking experiences. It offers improved control, stability, and durability on rough terrains. This suspension system is tailored for 26-inch wheels, ensuring compatibility with various bike models. The lightweight and robust construction makes it ideal for demanding trails. Riders can expect smooth absorption of shocks, reducing fatigue and enhancing ride quality. The system is easy to install and maintain, with detailed instructions provided in the owner’s manual. This guide covers setup, usage, and troubleshooting, ensuring optimal performance and safety for riders of all skill levels.

1.2 Importance of Proper Suspension Setup for Mountain Biking

Proper suspension setup is crucial for maximizing performance and safety. It ensures optimal bike handling, reducing the risk of accidents. A well-tuned suspension enhances control, allowing riders to navigate challenging terrains with confidence. Improper setup can lead to poor stability, increased fatigue, and potential damage to the bike. The owner’s manual provides detailed guidance, helping riders adjust settings like sag, rebound, and compression. Correct setup also prolongs the suspension’s lifespan, ensuring consistent performance over time. By following the manual’s instructions, riders can achieve a balanced and responsive ride, tailored to their specific needs and riding style.

Key Features and Benefits of the Ground Assault Front Bike Suspension

The Ground Assault Front Bike Suspension offers durable construction, improved control, and enhanced stability on rough terrains. Its reliable design ensures optimal performance, reducing rider fatigue and boosting confidence while riding.

2.1 Improved Control and Stability on Rough Terrains

The Ground Assault Front Bike Suspension excels on challenging trails, offering enhanced control and superior stability. Its robust design absorbs shocks effectively, reducing vibrations and ensuring smooth rides. Riders can maintain better grip and maneuverability, even at high speeds. This suspension system minimizes the impact of rough terrain, providing a more comfortable and confident riding experience. Whether tackling steep descents or rocky paths, the Ground Assault suspension delivers consistent performance, making it a reliable choice for avid mountain bikers seeking precision and control in demanding conditions.

2.2 Durable Construction and Reliability

The Ground Assault Front Bike Suspension is crafted with high-quality materials and a robust build, ensuring long-lasting performance. Its durable construction withstands the rigors of rough terrains and extreme conditions. Riders can rely on its consistent performance, even after repeated use. The suspension’s sturdy design minimizes wear and tear, reducing the need for frequent repairs. This reliability makes it a trusted choice for mountain bikers seeking a suspension system that can handle demanding trails without compromising on durability or performance over time.

Installation and Setup Guide

Ensure proper pre-installation checks, alignment, and torque specifications. Follow step-by-step instructions for secure mounting and adjustment. Refer to the manual for detailed guidance and tools required.

3.1 Pre-Installation Checks and Preparation

Before installing the Ground Assault Front Bike Suspension, ensure the bike is clean and free from debris. Check the fork’s compatibility with your bike’s frame and wheel size. Verify all hardware and tools are included. Ensure the seatpost and handlebars are properly secured. Refer to the manual for specific torque specifications. Inspect the suspension for any damage or wear. Prepare a clean workspace and gather necessary tools. Familiarize yourself with the installation steps to avoid errors. Safety gear is recommended during the process. Ensure all components are aligned correctly before proceeding.

3.2 Step-by-Step Installation Instructions

The manual guides you through a detailed installation process. Begin by removing the old fork and preparing the new suspension. Install the Ground Assault Front Bike Suspension, ensuring proper alignment with the frame. Tighten all bolts according to the specified torque values. Adjust the suspension settings to match your riding preferences. Double-check all connections for security and alignment. Finally, test the bike on a flat surface to ensure smooth operation. Refer to the manual for precise instructions and safety precautions to avoid damage or injury. Proper installation ensures optimal performance and safety.

Maintenance and Servicing Requirements

Regular cleaning, lubrication, and inspection are essential. Follow the manual’s guidelines to ensure longevity and reliability of the Ground Assault Front Bike Suspension system.

4.1 Regular Maintenance Tasks for Optimal Performance

Regular maintenance is crucial for the Ground Assault Front Bike Suspension. Clean the fork legs and stanchions after each ride to prevent dirt buildup. Lubricate the seals and bushings every 50 hours of riding to maintain smooth operation. Inspect the suspension for any signs of wear or damage, such as dented stanchions or worn-out seals. Drain and replace the suspension oil every 200 hours of use to ensure consistent damping performance. Refer to the manual for specific intervals and procedures to keep your suspension functioning at its best.

4.2 Advanced Servicing and Rebuild Procedures

Advanced servicing of the Ground Assault Front Bike Suspension requires specialized tools and technical expertise. Begin by disassembling the fork legs, ensuring proper alignment to avoid damage. Drain the old suspension oil and clean all internal components with a suitable solvent. Inspect seals, bushings, and stanchions for wear; replace them if necessary. Rebuild the suspension by reassembling the components in the reverse order of disassembly. Tighten all bolts to the manufacturer’s torque specifications. After servicing, test the suspension to ensure smooth operation and proper damping performance. Always refer to the manual for detailed instructions and safety guidelines.

Downloading the Owners Manual PDF

Access the official Ground Assault website to download the owners manual PDF. Use Adobe Acrobat for easy viewing. Ensure comprehensive guidance for setup, maintenance, and troubleshooting always.

5.1 How to Access the Ground Assault Front Bike Suspension Manual

To access the Ground Assault Front Bike Suspension manual, visit the official website. Use the search function to locate the PDF download link. Ensure compatibility with Adobe Acrobat for smooth viewing. If unavailable, check authorized dealers or online marketplaces like Tony’s Bike World. Some manuals are provided at the time of purchase. Always verify the source for authenticity and safety. Save the document for future reference and review it thoroughly before operating the suspension system.

5.2 Troubleshooting Common Issues Referenced in the Manual

The manual provides detailed troubleshooting guides for common issues like leakage, damping problems, or improper setup. Refer to the diagnostic charts for symptoms and solutions. Address issues promptly to maintain performance and safety. If problems persist, consult a professional mechanic. Always follow the manufacturer’s instructions for repairs to avoid further damage. Regular maintenance, as outlined in the manual, can prevent many of these issues. Ensure all adjustments align with the recommended settings for optimal functionality and rider safety.

Safety Considerations and Precautions

Always wear protective gear and follow manual guidelines. Ensure proper setup to avoid accidents. Regular inspections prevent mechanical failures. Avoid overloading the bike beyond recommended limits.

6.1 Essential Safety Tips for Riders

Always wear protective gear, including a helmet, gloves, and knee pads. Follow the owner’s manual guidelines for setup and maintenance. Ensure the suspension is properly adjusted for your weight and riding style. Avoid overloading the bike beyond the recommended capacity. Regularly inspect the suspension system for wear or damage. Never ride in poor visibility or extreme weather conditions without proper precautions. Stay alert and maintain control, especially on rough terrains. Keep loose clothing tied back and avoid distractions while riding. Follow traffic rules and be mindful of other cyclists and pedestrians. Prioritize safety to enjoy a secure and enjoyable riding experience;

6.2 Proper Storage and Handling of the Suspension System

Store the suspension system in a clean, dry environment, away from direct sunlight and moisture. Avoid exposing it to extreme temperatures or humidity. Use a soft cloth to wipe down the suspension after use to prevent dirt buildup. Never disassemble or modify the system without consulting the owner’s manual. Handle the suspension with care to avoid damaging sensitive components. Keep the suspension upright during storage to prevent fluid leakage. Consider using a protective cover to shield it from dust. Always follow the manufacturer’s guidelines for storage and handling to maintain optimal performance and longevity of the system.

7.1 Summary of Key Takeaways

The Ground Assault Front Bike Suspension manual emphasizes proper setup, maintenance, and safety. It highlights the importance of regular servicing, such as cleaning and inspecting seals, to ensure optimal performance. Riders are encouraged to follow manufacturer guidelines for installation and adjustments. Accessing the manual PDF is straightforward, providing detailed troubleshooting for common issues. Always prioritize safety by adhering to precautions and storing the suspension correctly. By following these guidelines, riders can maximize their biking experience, ensuring reliability and control on various terrains. Refer to the manual for specific instructions and model-specific details.

7.2 Final Tips for Maximizing Suspension Performance

To maximize performance, always follow the manual’s guidelines for setup and maintenance. Regularly clean and lubricate moving parts to ensure smooth operation. Adjust suspension settings according to your riding style and terrain for optimal control. Inspect for wear and tear, replacing components as needed. Refer to the manual for specific instructions and updates. Proper storage and handling are essential to prevent damage. By staying informed and proactive, riders can enhance their biking experience, ensuring the suspension system performs at its best for years to come.

crock pot express manual

Welcome to the Crock Pot Express Manual, your ultimate guide to mastering this versatile multi-cooker. This manual provides essential instructions, safety tips, and feature details to ensure optimal use and delicious results.

1.1 Overview of the Crock Pot Express

The Crock Pot Express is a multi-functional electric cooker designed for pressure cooking, slow cooking, steaming, sautéing, and boiling. Its versatility and efficiency make it a valuable addition to any kitchen, offering a wide range of cooking options for delicious and convenient meal preparation.

1.2 Importance of Reading the Manual

Reading the manual is crucial for understanding safety guidelines, optimal usage, and troubleshooting. It ensures you grasp the Crock Pot Express’s features, proper setup, and maintenance, helping you achieve the best cooking results while preventing potential hazards and extending the appliance’s lifespan.

Safety Precautions

Always follow electrical safety guidelines, avoid overfilling, and keep children away. Never leave the cooker unattended during operation and ensure proper handling to prevent accidents and ensure safe usage.

2.1 General Safety Tips

Always place the Crock Pot Express on a stable, heat-resistant surface. Keep children away during operation. Avoid overfilling the pot, as this can lead to spills. Never leave the cooker unattended while in use. Ensure all electrical components are handled with care to prevent accidents and maintain safe operating conditions at all times.

2.2 Electrical Safety Guidelines

Never submerge the Crock Pot Express in water or expose electrical components to moisture. Use only approved, undamaged power cords and avoid overloading circuits. Keep the cooker away from water sources and ensure proper ventilation. Always unplug the unit when not in use or during cleaning to prevent electrical hazards or shocks.

2.3 Handling Precautions

Always use oven mitts or tongs to handle hot components. Avoid touching the cooker’s exterior during operation. Keep children away from the unit while in use. Never overcrowd the cooking pot, as this may cause spills or uneven cooking. Ensure the lid is securely locked before pressurizing and avoid sudden movements.

Product Features

The Crock Pot Express is a multi-functional electric cooker offering pressure cooking, slow cooking, steaming, sautéing, and boiling. It features customizable settings for versatile meal preparation and ease of use.

3.1 Key Components of the Crock Pot Express

The Crock Pot Express includes a durable cooking pot, a secure-fitting lid, a user-friendly control panel, and a steamer basket. These components work together to enable pressure cooking, slow cooking, and other functions efficiently.

3.2 Multi-Functional Capabilities

The Crock Pot Express offers versatile cooking options, including pressure cooking, slow cooking, steaming, sautéing, and boiling. These multi-functional features allow users to prepare a wide variety of dishes efficiently, making it a convenient and adaptable kitchen appliance for everyday meals and special recipes.

3.3 Customizable Settings

The Crock Pot Express features adjustable settings for pressure levels, timer, and cooking modes. Users can customize cooking times and pressures to suit various recipes, ensuring precise control over dishes. This flexibility allows for tailored cooking experiences, from tenderizing tough meats to gently cooking delicate fish, enhancing overall culinary results.

First-Time Use Instructions

Unpack and wash all components thoroughly. Follow the pre-use checklist for safety and functionality. Complete initial cleaning to ensure your Crock Pot Express is ready for cooking.

4.1 Unpacking and Initial Setup

Carefully unpack your Crock Pot Express and inspect for any damage. Wash all components with mild soap and rinse thoroughly. Place the cooker on a stable, heat-resistant surface. Plug in the unit and ensure proper ventilation. Follow the manual’s initial setup steps to prepare for first use safely and effectively.

4.2 Before First Use Checklist

Inspect the cooker for damage, wash all parts with mild soap, and dry thoroughly. Ensure all accessories are included and undamaged. Read the manual carefully to understand operation. Familiarize yourself with safety guidelines and settings. Verify the power cord is intact and functional. Ensure the cooking pot is securely placed before first use.

4.3 Initial Cleaning and Maintenance

After unpacking, clean the cooking pot, lid, and accessories with mild soap and warm water. Avoid abrasive cleaners to prevent damage. Dry thoroughly to prevent rust. Regularly wipe the exterior with a damp cloth. Check for food residue and clean seals to ensure proper function. Maintain cleanliness for optimal performance and safety.

Pressure Cooking Instructions

Pressure cooking with the Crock Pot Express requires sufficient liquid and a securely locked lid. Always refer to the manual for specific instructions and safety guidelines to ensure perfect results.

5.1 How to Start Pressure Cooking

To begin pressure cooking, add liquid and ingredients to the pot, ensuring the lid is securely locked. Place the valve in the sealing position, select your desired mode, and set the cooking time and pressure level using the control panel. Press start to initiate the process; Always monitor and follow safety guidelines from the manual.

5.2 Setting the Timer and Pressure Levels

Use the control panel to set the timer and pressure levels. Select high or low pressure using the pressure button, then adjust the cooking time with the +/- buttons. Ensure the valve is in the correct position and liquid levels do not exceed the MAX line. Always refer to the manual for specific guidelines.

5.3 Releasing Pressure Safely

After cooking, allow natural pressure release by letting the steam vent on its own. For quick release, carefully turn the valve to release remaining pressure. Always keep hands away from the steam vent to avoid burns. Refer to the manual for specific instructions on safe pressure release methods for your Crock Pot Express.

Slow Cooking Instructions

Explore the convenience of slow cooking with customizable settings for perfect results. Ideal for hands-off meals, the Crock Pot Express offers flexibility and ease of use.

6.1 Understanding Slow Cooking Modes

The Crock Pot Express offers multiple slow cooking modes, including low, medium, and high settings, allowing you to customize cooking times for various recipes. These modes provide flexibility to achieve perfect doneness for meats, stews, and vegetables, ensuring tender results every time with minimal effort required during the cooking process.

6.2 Setting Up for Slow Cooking

To set up for slow cooking, add your ingredients and liquids to the cooking pot, ensuring the lid is securely locked. Select the desired slow cooking mode (low, medium, or high) using the control panel, then set the timer according to your recipe. Plug in the unit and press start for a seamless cooking experience.

6.3 Monitoring and Adjusting Settings

Monitor the cooking progress through the digital display. Adjust settings like timer, temperature, or mode as needed. Ensure the lid remains sealed during slow cooking to maintain heat and moisture. Stir ingredients occasionally if required, and always unplug the unit before making adjustments to avoid accidents or uneven cooking results.

Steaming Instructions

Place water and the steamer basket in the pot. Add ingredients, secure the lid, and set pressure to HIGH. Steam for 10-20 minutes, depending on the food type, ensuring tender and nutritious results without overcooking.

7.1 Preparing for Steaming

Add water to the cooking pot, place the steamer basket inside, and arrange ingredients evenly. Ensure the lid is securely locked and the valve is set to SEAL. Refer to recommended steaming times for specific foods to achieve perfectly cooked, tender results every time.

7.2 Using the Steamer Basket

Place the steamer basket inside the cooking pot, ensuring it sits securely above the water. Arrange ingredients like vegetables or seafood in a single layer. Avoid overfilling to allow steam circulation. Secure the lid, set the valve to SEAL, and follow recommended steaming times for perfectly cooked, nutritious meals every time.

7.3 Recommended Steaming Times

For optimal results, steam vegetables like broccoli or carrots for 5-7 minutes, seafood such as shrimp for 8-10 minutes, and proteins like chicken for 12-15 minutes. Delicate foods like fish or dumplings require 8-10 minutes. Adjust times based on ingredient size and desired tenderness for perfectly steamed dishes using your Crock Pot Express.

Sautéing and Browning Instructions

The Crock Pot Express allows for sautéing and browning, enabling you to achieve crispy textures and caramelized flavors. This feature enhances cooking versatility, making it ideal for preparing a variety of dishes with added flavor and texture before switching to other cooking modes.

8.1 Activating Sauté Mode

To activate Sauté Mode on your Crock Pot Express, press the “Sauté” button located on the control panel. Choose from three heat settings: Low, Medium, or High. Ensure the lid is off for proper operation. Always stay nearby when sautéing to monitor progress and avoid overheating or burning your ingredients.

8.2 Browning Meat and Vegetables

For browning meat and vegetables, use the Sauté Mode on your Crock Pot Express. Add a small amount of oil to the pot, then place your ingredients in a single layer. Cook in batches if necessary to avoid overcrowding, ensuring even browning. Stir occasionally for consistent results.

Use a spatula to flip or stir ingredients. Avoid closing the lid during browning. Season with spices or herbs as desired for enhanced flavor. Browning adds texture and flavor, making it a great step before switching to other cooking modes.

8.3 Safety Tips for Sautéing

Always use oven mitts when handling the pot during sautéing. Never leave the cooker unattended while in Sauté Mode. Keep children away from the unit to avoid accidents. Avoid overcrowding the pot to ensure even cooking and prevent spills. Use a spatula carefully to avoid splashing hot ingredients.

Boiling Instructions

Add water to the cooking pot, ensuring it does not exceed the MAX line. Secure the lid and select the Boil function. Monitor the process closely to avoid overflow.

9.1 Setting Up for Boiling

Fill the cooking pot with water, ensuring it does not exceed the MAX line. Place ingredients like potatoes or eggs inside. Secure the lid, select the Steam or Boil function, and set the timer as needed for your recipe.

9.2 Adding Water and Ingredients

Add water to the cooking pot, ensuring the water level does not exceed the MAX line. Place ingredients like vegetables, meats, or grains into the pot. Add seasonings or spices as desired. Avoid overfilling to prevent overflow during boiling. Secure the lid properly before starting the cooking process.

9.3 Monitoring Boiling Process

Monitor the boiling process by observing the rolling bubbles and steam release. Adjust heat settings if necessary to maintain a steady boil. Ensure the lid is securely locked to prevent overflow. Check liquid levels periodically to avoid drying out. Use the steamer basket for even cooking distribution and optimal results.

Troubleshooting Common Issues

Address common issues like error codes or malfunction by resetting the device or checking connections. Refer to the manual for specific solutions or contact support if unresolved.

10.1 Common Errors and Solutions

Identify and resolve common errors such as overheating or lid issues. Ensure the lid is sealed properly and avoid exceeding the max fill line. For error codes, restart the device or check power connections. Refer to the manual for detailed solutions to maintain optimal performance and safety while cooking.

10.2 Resetting the Device

To reset the Crock Pot Express, unplug it from the power source, wait 30 seconds, and plug it back in. This resolves issues like error codes or malfunctioning controls. Regular resets can improve performance and address unexpected glitches. Always ensure the device is cool before resetting for safety.

10.3 When to Contact Support

Contact support if issues persist after troubleshooting. Reach out for unresolved error codes, faulty components, or unclear manual instructions. Ensure you’ve reviewed the manual thoroughly. Visit the official website or contact via phone/email for assistance. Reference your model number (e.g., CSC051X, CPE300) for quicker resolution.

Maintenance and Cleaning

Regular maintenance ensures longevity. Clean the pot and lid after each use. Deep clean periodically by soaking parts. Store securely, ensuring all components are dry to prevent moisture damage.

11.1 Daily Cleaning Routine

After each use, wash the cooking pot and lid with warm soapy water. For tough stains, soak overnight. Dry thoroughly to prevent rust. Regular cleaning prevents food residue buildup, ensuring optimal performance and hygiene. Avoid abrasive cleaners to maintain the finish. Refer to the manual for specific care instructions for all parts.

11.2 Deep Cleaning Tips

For deep cleaning, mix equal parts water and white vinegar in the pot and run a steam cycle. Scrub stubborn stains with a soft brush. Clean the heating element with a damp cloth. Regularly descale to remove mineral buildup, especially in hard water areas. Dry all parts thoroughly after cleaning to prevent rust.

11.3 Storing the Crock Pot Express

Store the Crock Pot Express in a cool, dry place. Ensure all parts are completely dry after cleaning. Keep the lid securely closed to prevent dust accumulation. Avoid stacking heavy objects on the appliance. Store accessories separately to maintain their shape and functionality. Proper storage extends the lifespan of your Crock Pot Express.

Congratulations! You’ve mastered the Crock Pot Express. This versatile multi-cooker empowers you to create delicious meals effortlessly. Explore its features, experiment with recipes, and enjoy culinary success.

12.1 Final Tips for Optimal Use

For the best experience with your Crock Pot Express, experiment with recipes, refer to the manual for guidance, and maintain the device regularly. Avoid overfilling, clean after each use, and explore all cooking modes. This multi-cooker is designed to save time and enhance flavor—enjoy its versatility and get creative in the kitchen!

12.2 Encouragement to Explore More Features

Don’t stop at the basics! Your Crock Pot Express offers a wide range of features to enhance your cooking experience. From pressure cooking to slow cooking, steaming, and sautéing, explore all modes to discover new recipes and culinary possibilities. Experiment with settings and functions to unlock the full potential of your multi-cooker.

pride victory 10 scooter manual

The Pride Victory 10 Scooter is a high-performance, versatile mobility solution designed for both indoor and outdoor use. With a weight capacity of 400 lbs and a maximum speed of 5.3 mph, it offers a reliable and comfortable experience.

1;1 Overview of the Pride Victory 10 Model

The Pride Victory 10 is a mid-size, three-wheeled mobility scooter known for its reliability and comfort. With a weight capacity of 400 lbs and a top speed of 5.3 mph, it balances performance and ease of use. Designed for both indoor and outdoor navigation, it features a sleek design and robust construction, making it a popular choice for users seeking independence and mobility. Its compact dimensions (52″ L x 24″ W x 37″ H) ensure maneuverability in tight spaces.

1.2 Key Features and Benefits

The Pride Victory 10 scooter offers exceptional mobility with a weight capacity of 400 lbs and a top speed of 5.3 mph. Its three-wheel design provides stability and ease of maneuverability. The scooter features a comfortable, adjustable seat and a robust frame built for durability. Additional benefits include a user-friendly control panel, smooth throttle control, and a reliable braking system. Its compact dimensions make it ideal for both indoor and outdoor use, ensuring versatility and convenience for users seeking independence and comfort.

Technical Specifications

The Pride Victory 10 scooter features a weight capacity of 400 lbs, maximum speed of 5.3 mph, and dimensions of 1320 x 620 x 940 mm. It has a rear wheel with suspension and a front wheel, designed as a three-wheel model for stability.

2.1 Weight Capacity and Performance

The Pride Victory 10 scooter has a weight capacity of 400 lbs, ensuring robust support for users. It delivers smooth performance with a maximum speed of 5.3 mph, suitable for both indoor and outdoor environments. The scooter’s design balances stability and maneuverability, making it ideal for various terrain types while maintaining user comfort and reliability.

2.2 Speed and Range Capabilities

The Pride Victory 10 scooter offers a maximum speed of 5.3 mph, providing a balance between comfort and efficiency. Its range capabilities extend up to 24km on a single charge, ensuring extended use for both indoor and outdoor activities. This makes it an ideal choice for users needing reliable mobility over various distances without frequent recharging.

2.3 Dimensions and Design

The Pride Victory 10 scooter features a compact design with dimensions of 1320 x 620 x 940 mm, making it suitable for both indoor and outdoor navigation. Its 4-wheel configuration ensures stability, while the anti-tip caster enhances safety. The scooter’s lightweight frame and ergonomic design provide comfort and ease of use. Pneumatic tires and a robust suspension system contribute to a smooth ride, ensuring optimal performance across various terrains.

Operating the Pride Victory 10

Operating the Pride Victory 10 is straightforward, featuring an intuitive control panel, responsive throttle, and ergonomic design for a comfortable and controlled riding experience.

3.1 Throttle Control and Speed Settings

The throttle control on the Pride Victory 10 allows users to adjust speed smoothly with a lever. It includes forward and reverse functions, with a preset maximum speed. The scooter features easy-to-use speed settings, ensuring a safe and controlled ride. Adjustments can be made to suit different environments, from indoor maneuvering to outdoor terrain, enhancing overall mobility and convenience for users.

3.2 Understanding the Control Panel

The Pride Victory 10 control panel is designed for intuitive operation. It features a throttle control lever for speed adjustment, a speed dial to set maximum velocity, and indicators for battery level and mode. The panel also includes buttons for horn, lights, and mode selection. Understanding these components ensures safe and efficient operation. The control panel is user-friendly, allowing easy customization of settings to suit individual preferences and riding conditions.

Maintenance and Care

Regular maintenance ensures optimal performance. Check tire pressure, clean the scooter, and lubricate moving parts. Proper care extends the life of your Pride Victory 10.

4.1 Regular Maintenance Tips

Regular maintenance is essential to ensure the scooter’s longevity. Check tire pressure monthly, clean the scooter with a damp cloth, and lubricate moving parts every 50 hours. Inspect the brakes and battery connections regularly. Keep the scooter dry to prevent rust and corrosion. Store it in a cool, dry place when not in use. Follow the manual’s schedule for routine checks to maintain optimal performance and safety.

4.2 Battery Care and Charging

Proper battery care is crucial for optimal performance. Charge the battery after each use, ensuring it reaches full capacity. Avoid overcharging, as it can reduce battery life. Clean terminals regularly to prevent corrosion and ensure secure connections. Store the battery in a cool, dry place during extended periods of non-use. Always use the charger provided with your scooter to maintain safety and efficiency. Refer to the manual for specific charging instructions.

Safety Guidelines

Always wear protective gear and ensure the scooter is in good working condition. Follow traffic rules and be mindful of surroundings to ensure safe and enjoyable rides.

5.1 Safe Riding Practices

Always prioritize safety when operating the Pride Victory 10 scooter. Wear protective gear, follow traffic rules, and ensure the scooter is in good working condition. Be mindful of your surroundings, avoid uneven terrain, and use the scooter’s features responsibly. Regular checks and proper usage enhance safety and longevity of the device.

5.2 Importance of Proper Usage

Proper usage of the Pride Victory 10 scooter is essential for safety, efficiency, and longevity. Always adhere to the manufacturer’s guidelines, ensuring the scooter is used as intended. Avoid exceeding weight capacity and follow recommended speed limits. Regularly inspect and maintain the scooter to prevent mechanical issues. Proper usage also includes correct battery care and storage, ensuring optimal performance and extending the scooter’s lifespan.

Troubleshooting Common Issues

The Pride Victory 10 scooter may experience issues like battery drain or malfunction. Check connections, charge levels, and test the throttle. Inspect for worn parts and ensure proper assembly. Regular maintenance helps prevent breakdowns and ensures smooth operation.

6.1 Diagnosing and Solving Problems

Diagnosing issues with the Pride Victory 10 scooter involves checking the battery charge, connections, and throttle function. If the scooter doesn’t start, ensure the battery is fully charged and properly connected. Test the throttle and brakes for responsiveness. Inspect tires and brakes for wear. For persistent problems, consult the manual or contact customer support. Regular maintenance can prevent many common issues, ensuring optimal performance and longevity of the scooter.

Accessories and Upgrades

The Pride Victory 10 scooter offers various accessories to enhance comfort and functionality. Popular options include weather canopies, storage baskets, and adjustable armrests. These upgrades ensure a personalized fit.

7.1 Recommended Accessories

The Pride Victory 10 scooter offers a range of recommended accessories to enhance user experience. Popular options include weather canopies for outdoor protection, storage baskets for convenient item transport, and adjustable armrests for added comfort. Additionally, LED light kits can improve visibility and safety, while custom seat cushions provide extra support. These accessories are designed to maximize comfort, practicality, and personalization for users.

Warranty and Support

The Pride Victory 10 scooter includes a 1-year warranty covering parts and labor, plus dedicated customer support for inquiries and assistance.

8.1 Understanding Your Warranty

The Pride Victory 10 scooter comes with a comprehensive 1-year warranty that covers parts and labor, ensuring peace of mind for owners. The warranty is provided by Pride Mobility, a trusted name in mobility solutions. It typically covers defects in materials and workmanship under normal use. For specific details, reviewing the official warranty document or contacting customer support is recommended to understand coverage limits and exclusions fully.

8.2 Customer Support Options

Pride Mobility offers comprehensive customer support for the Victory 10 scooter. Owners can access assistance through phone, email, or online resources. The official website provides manuals, troubleshooting guides, and FAQs. Additionally, authorized dealers offer in-person support for repairs and maintenance. Pride’s dedicated team ensures prompt resolution of inquiries, enhancing the overall ownership experience with reliable and efficient service options tailored to user needs.

The Pride Victory 10 scooter is a reliable and versatile mobility solution, offering excellent performance, comfort, and durability. Its user-friendly design and robust features make it ideal for both indoor and outdoor use. With comprehensive customer support and a detailed manual, users can confidently navigate and maintain their scooter. The Victory 10 continues to be a top choice for those seeking independence and mobility, backed by Pride’s commitment to quality and customer satisfaction.

statecraft manual

Statecraft manuals are foundational guides outlining strategies for effective governance, diplomacy, and leadership․ They provide insights into managing power, resources, and international relations, as seen in works like The Prince․

Key Elements of Statecraft

Statecraft is a multifaceted field encompassing diplomacy, leadership, economic strategy, military planning, and crisis management․ These elements ensure effective governance and national stability․

Diplomacy and International Relations

Diplomacy is a cornerstone of statecraft, involving strategic communication and negotiation to build alliances and resolve conflicts․ Effective international relations require empathy, cultural awareness, and the ability to navigate complex geopolitical landscapes․ Strong diplomatic skills ensure mutual understanding and cooperation, fostering stability and preventing escalations․ This approach is vital for maintaining peace and advancing national interests globally․

Leadership and Governance

Effective leadership is essential for successful governance, requiring vision, decisiveness, and ethical judgment․ Leaders must balance power dynamics while fostering trust and accountability․ By prioritizing long-term goals and adapting to challenges, they ensure stability and prosperity․ Strong governance frameworks guide decision-making, promoting transparency and fairness, which are critical for sustaining public confidence and achieving enduring success․

Economic Strategy and Development

Economic strategy is vital for national growth, focusing on resource optimization, infrastructure investment, and trade agreements․ Effective development ensures sustainable progress by balancing innovation with equitable policies․ Leaders must align economic goals with long-term vision, fostering resilience and prosperity․ Strategic planning and adaptability are key to navigating global markets and securing a stable financial future for generations․

Military Affairs and Defense

Military strategy is central to national security, involving defense planning, intelligence, and tactical execution․ Effective defense ensures sovereignty and stability, requiring modernization and adaptability․ Leaders must balance strength with diplomacy, prioritizing strategic interests and minimizing conflict․ Robust military affairs are essential for protecting resources and maintaining global influence in an ever-evolving security landscape․

The Role of Leadership in Statecraft

Leadership in statecraft involves visionary guidance, strategic decision-making, and ethical frameworks․ Effective leaders align national goals with moral integrity, fostering trust and sustainable governance․

Visionary Leadership

Visionary leadership in statecraft involves setting clear, long-term goals and inspiring loyalty through compelling narratives․ Leaders like Sanguinius evoke admiration, fostering devotion akin to religious fervor, aligning people with a greater purpose․

Decision-Making Processes

Effective statecraft relies on structured decision-making, blending critical thinking with informed strategies․ Leaders must weigh options, anticipate outcomes, and adapt to evolving circumstances․ Clear communication and collaboration ensure alignment with national goals․ Sanguinius’s ability to inspire devotion highlights the importance of aligning decisions with a shared vision, fostering unity and purpose in governance․

Ethical Considerations

Ethical considerations in statecraft are crucial for maintaining legitimacy and trust․ Leaders must balance power with responsibility, ensuring actions align with moral principles․ Issues like human rights, accountability, and the consequences of decisions are paramount․ Reflecting on historical figures and modern dilemmas, ethical frameworks guide leaders to avoid exploitation and promote justice, as seen in discussions about “Hollow Men” and war criminals․

Economic Strategy and National Development

Economic strategy in statecraft involves managing resources, developing infrastructure, and fostering trade to ensure sustainable growth and national prosperity, aligning policies with long-term development goals․

Resource Management

Resource management in statecraft involves strategic allocation and optimization of financial, natural, and human resources to ensure sustainability and efficiency․ Effective management prevents scarcity, enhances productivity, and supports long-term development, while mismanagement can lead to economic instability and societal unrest, underscoring its critical role in national development and security․

Infrastructure Development

Infrastructure development is a cornerstone of statecraft, enabling economic growth and social stability․ It encompasses transportation networks, energy systems, and public services, ensuring connectivity and access․ Strategic investment in infrastructure enhances national security, fosters innovation, and improves quality of life, requiring careful planning and long-term vision to align with societal and economic goals effectively․

Trade Agreements

Trade agreements are essential tools in statecraft, fostering economic collaboration and strengthening international partnerships․ They promote stability, reduce trade barriers, and enhance global competitiveness․ By aligning economic interests, agreements ensure mutual benefits, driving growth and improving living standards․ Effective trade strategies balance economic goals with strategic interests, making them a vital component of modern statecraft and diplomacy․

Military Affairs and National Security

Military strategy is a cornerstone of statecraft, ensuring national security through defense planning, intelligence, and modern tactics․ Effective military affairs safeguard sovereignty and protect vital interests․

Strategic Defense Planning

Strategic defense planning involves analyzing threats, allocating resources, and deploying forces to safeguard national interests․ It integrates military strength with economic strategies, ensuring long-term security․ Real-world applications, like lessons from U․S․ involvement in conflicts, highlight the importance of adaptive planning to address evolving threats effectively while maintaining global stability and protecting critical technologies․

Intelligence Operations

Intelligence operations are critical in statecraft, enabling informed decision-making through data collection and analysis․ They involve gathering strategic insights to anticipate threats and opportunities․ Experienced leaders, like former CENTCOM commanders, emphasize the importance of intelligence in shaping defense strategies and protecting critical technologies, ensuring national security and stability in an evolving global landscape․

Modern Warfare Tactics

Modern warfare tactics integrate advanced technologies and strategic insights to address contemporary conflicts․ They involve cyber operations, drone warfare, and intelligence-driven approaches․ Discussions by experts like Petraeus and Zinni highlight the evolution of military strategies, emphasizing adaptability and precision in protecting national interests and ensuring global stability in an increasingly complex geopolitical landscape․

Crisis Management and Conflict Resolution

Crisis management involves strategic communication and conflict resolution techniques to address disputes․ Experts like Petraeus and Zinni discuss lessons from conflicts, emphasizing adaptability and diplomacy․

Negotiation Techniques

Negotiation techniques are essential in statecraft, involving active listening, empathy, and strategic concessions․ Effective communication and clarity of objectives are crucial․ Leaders must balance firmness with flexibility, fostering trust while maintaining leverage․ Historical examples, like diplomatic resolutions in international conflicts, highlight the importance of negotiation in achieving peaceful outcomes without compromising national interests or ethical standards․

Crisis Communication

Crisis communication is critical in statecraft, requiring transparency and empathy․ Leaders must convey clear, consistent messages to maintain public trust․ Strategies include timely updates, acknowledging uncertainties, and providing actionable information․ Effective communication can mitigate panic and foster resilience, as seen in historical examples where leaders navigated crises by balancing honesty with reassurance, ensuring stability and preserving national cohesion during challenging times․

Post-Conflict Reconstruction

Post-conflict reconstruction involves rebuilding institutions, economies, and social structures․ It requires coordinated efforts to ensure stability, justice, and sustainable development․ Lessons from historical examples emphasize the importance of inclusive governance, accountability, and addressing root causes of conflict․ Effective reconstruction fosters long-term peace and prevents relapse into violence, ensuring a resilient and prosperous future for affected communities and nations․

Legal and Ethical Frameworks in Statecraft

Statecraft relies on legal and ethical frameworks to ensure actions align with international law, human rights, and accountability․ These principles guide decision-making, promoting justice and legitimacy globally․

International Law

International law forms the cornerstone of statecraft, governing interactions between nations․ It establishes norms for diplomacy, conflict resolution, and human rights, ensuring that state actions remain lawful and just on the global stage․

Human Rights

Human rights are a cornerstone of statecraft, emphasizing justice, equality, and dignity․ They guide ethical governance, ensuring policies align with moral standards․ Effective statecraft requires balancing power with accountability, fostering trust domestically and internationally․ Works like The Prince highlight the importance of integrating human rights into strategies for sustainable and principled leadership․

Accountability Mechanisms

Accountability mechanisms ensure transparency and ethical governance in statecraft․ They establish systems to monitor and evaluate leadership actions, fostering trust and responsibility․ These mechanisms are vital for maintaining integrity and preventing abuse of power, as highlighted in manuals like The Prince, which emphasize the importance of ethical leadership and accountability in governance․

Case Studies in Effective Statecraft

Case studies in effective statecraft analyze historical and modern examples of successful governance․ They highlight visionary leadership, strategic decision-making, and ethical governance, offering lessons for modern leaders․ These studies provide practical insights into managing power, diplomacy, and national development, drawing from figures like Sanguinius and texts like The Prince․

Historical Examples

Historical examples of statecraft manuals include The Prince by Machiavelli, a cornerstone of political strategy․ It outlines principles for maintaining power and leadership, emphasizing pragmatic governance․ Similarly, Sanguinius, a revered figure, inspired devotion through visionary leadership, demonstrating how charisma and wisdom can shape governance․ These examples highlight enduring lessons in diplomacy, ethics, and effective rule․

Modern Applications

Modern statecraft manuals integrate contemporary challenges, such as strategic diplomacy and economic strategies․ They emphasize adaptive leadership, crisis management, and technological advancements․ Current examples include discussions by former CENTCOM commanders on military strategies and reflections on the Commerce Department’s role in protecting critical technology, showcasing evolving approaches to governance and global security․

Lessons Learned

Lessons learned from statecraft manuals emphasize adaptability, ethical governance, and strategic foresight․ Historical examples, like Sanguinius’s leadership, highlight the importance of inspiring devotion and maintaining order․ Modern applications, such as discussions by former CENTCOM commanders, reveal the necessity of integrating military strategies with global diplomacy, while reflections on The Prince underscore timeless principles of power and governance․

Statecraft manuals remain vital for navigating modern governance and diplomacy, blending historical wisdom with contemporary challenges․ As global dynamics evolve, future statecraft must integrate technological advancements, ethical frameworks, and visionary leadership to address emerging threats and opportunities․ By learning from past successes and failures, leaders can forge resilient strategies, ensuring prosperity and security in an increasingly complex world․

black diamond headlamp instruction manual

Welcome to the Black Diamond Headlamp Instruction Manual! This guide provides essential information for safe and effective use, covering features, assembly, operation, and maintenance. Ensure optimal performance and longevity by following the detailed instructions carefully.

Overview of the Headlamp and Its Features

The Black Diamond Headlamp is a versatile, high-performance lighting solution designed for outdoor enthusiasts. It features multiple light modes, including low, medium, and high settings, as well as red light options for preserving night vision. The headlamp is USB-rechargeable, with a battery life indicator to monitor power levels. Its durable design ensures reliability in rugged conditions, while adjustable brightness and a secure fit enhance user comfort. Built for efficiency and adaptability, it’s ideal for climbing, hiking, and everyday use.

Purpose and Scope of the Manual

This manual is designed to guide users in understanding and utilizing their Black Diamond Headlamp effectively. It covers setup, operation, maintenance, and troubleshooting, ensuring optimal performance and longevity; The manual is intended for both novice and experienced users, providing clear, step-by-step instructions to help you get the most out of your headlamp. By following this guide, you’ll be able to operate your headlamp safely and efficiently in various outdoor and indoor settings.

Components and Accessories of the Black Diamond Headlamp

Key Parts of the Headlamp

The Black Diamond Headlamp features a USB-rechargeable battery, Red LED mode for preserving night vision, and multiple brightness settings for versatile lighting needs. Includes a secure fit headband.

The Black Diamond Headlamp consists of a USB-rechargeable battery, a high-performance LED light source, and a durable headband for secure fit. It features a Red LED mode for night vision preservation, multiple brightness settings, and a locking mechanism to prevent accidental activation. The headlamp is designed with a weather-resistant construction and adjustable tilt for directional lighting. Its lightweight and ergonomic design ensures comfort during extended use, making it ideal for outdoor activities like hiking, climbing, and camping.

Included Accessories and Optional Add-Ons

The Black Diamond Headlamp comes with a rechargeable battery, USB cable, and an adjustable headband. Additional accessories include a battery case, red light mode for night vision, and a tilt adjustment feature. Optional add-ons like extra batteries, a storage pouch, and a detachable light unit enhance functionality. These accessories ensure versatility and convenience, catering to various outdoor and climbing needs while maintaining durability and performance. They complement the headlamp’s robust design, offering users a comprehensive lighting solution for diverse environments and activities.

Installation and Assembly Instructions

Attach the headlamp to the headband by aligning the clips and securing firmly. Insert the rechargeable battery into the compartment, ensuring proper orientation. Use the USB cable for charging. Adjust the headband for a comfortable fit and test the tilt adjustment. Follow these steps to ensure proper assembly and functionality. Refer to the manual for detailed visuals and troubleshooting tips.

Step-by-Step Assembly Process

Begin by unpacking the headlamp and its accessories. Attach the headlamp to the headband by aligning the clips and securing them firmly. Insert the battery into the compartment, ensuring the positive terminal faces upwards. Connect the USB cable to the battery for charging. Once charged, adjust the headband to fit your head comfortably. Test the light tilt adjustment to ensure it moves smoothly. Finally, turn on the headlamp to verify all functions are operational. Follow these steps carefully for proper assembly and functionality.

Attaching the Headlamp to the Headband

To attach the headlamp to the headband, align the headlamp’s mounting clips with the headband’s receptacles. Gently press the clips into place until they securely snap in. Ensure the headlamp is centered and evenly balanced for optimal comfort. Adjust the tilt mechanism to direct the light beam as needed. Tighten the side straps to secure the headlamp firmly to the headband. Make sure all connections are snug to prevent shifting during use. This ensures a stable and comfortable fit for any activity. Proper attachment is crucial for reliable performance and safety.

Battery Management and Charging

Properly manage your Black Diamond headlamp’s battery by using recommended rechargeable batteries and avoiding overcharging. Ensure batteries are stored correctly when not in use for optimal longevity and performance.

Types of Batteries and Charging Methods

Your Black Diamond headlamp is compatible with rechargeable batteries, such as NiMH, offering eco-friendly and cost-effective power. For convenience, it can also use disposable alkaline batteries. Charging is typically done via a USB port or a dedicated battery pack. Some models include a battery life indicator to monitor charge levels. Always use high-quality batteries to ensure reliable performance and longevity. Proper charging and storage practices are essential to maintain battery health and prevent degradation over time.

Best Practices for Battery Care and Longevity

To maximize battery life, avoid extreme temperatures and full discharges. Store batteries in a cool, dry place when not in use. For rechargeable batteries, avoid overcharging, as it can reduce capacity. Clean terminals regularly to ensure good connections. Replace expired or damaged batteries promptly. Always use the correct charger and follow charging guidelines. Proper care ensures consistent performance and extends the lifespan of your Black Diamond headlamp’s power source. Regular maintenance is key to reliability in the field.

Operating the Black Diamond Headlamp

Press the ON/OFF button to activate the headlamp. Cycle through light modes by pressing the button again. Use the red light mode for preserving night vision and lock the headlamp to prevent accidental activation.

Turning the Headlamp On/Off and Basic Controls

Press and hold the ON/OFF button for 2 seconds to turn the headlamp on or off. The headlamp offers Low, Medium, and High modes; press the button once for Low, again for Medium, and a third time for High. For Red Light mode, press and hold until the light turns red to preserve night vision. Locking the headlamp by pressing the LOCK button for 2 seconds prevents accidental activation, ensuring convenience and safety during storage or transport.

Navigating Through Different Light Modes and Settings

Press the button once for Low mode, again for Medium, and a third time for High. For Red Light mode, press and hold until the light turns red. To toggle between red light modes, press the Mode button. The headlamp also features a lock mode to prevent accidental activation. Cycle through settings by pressing the button, ensuring optimal brightness for various activities. Note that high-power modes may create electromagnetic interference with avalanche transceivers, so use caution in relevant environments.

Adjusting and Customizing the Headlamp

Customize your headlamp for optimal comfort and performance by adjusting the fit, brightness, and light modes. Use the tilt mechanism to direct light where needed for precise illumination.

Fitting the Headlamp for Comfort and Security

Ensure a secure and comfortable fit by adjusting the elastic headband to suit your head size. The padded design provides stability and prevents slipping during activities. For added security, tighten the band slightly, especially for high-intensity movements. Proper fitting prevents the headlamp from shifting, allowing you to focus on your task without distractions. Regularly check and adjust the fit for optimal comfort and performance.

Customizing Light Output and Modes

Customize light output by pressing the Mode button to cycle through Low, Medium, and High settings. For Red Light mode, press and hold the button until the light turns on. Toggle between Red modes by pressing the button again; Adjust brightness by holding the button to dim or brighten. Memory mode remembers your last setting for quick access. Experiment with combinations to find the perfect configuration for your activity, ensuring optimal visibility and battery efficiency in any situation.

Maintenance and Care Instructions

Regularly clean the lens with a soft cloth and store the headlamp in a cool, dry place to maintain performance and longevity.

Cleaning and Storage Recommendations

Regularly clean the headlamp’s lens with a soft, dry cloth to maintain optical clarity. Avoid using harsh chemicals or abrasive materials. Store the headlamp in a cool, dry place, away from direct sunlight and moisture. Ensure batteries are removed or fully charged before long-term storage. Clean battery contacts with a soft cloth if corrosion occurs. Avoid submerging the headlamp in water. Use the original case or a protective pouch to prevent dust and damage during storage.

Troubleshooting Common Issues

If the headlamp doesn’t turn on, check the battery connections and ensure they are clean and free of corrosion. Replace or recharge batteries as needed. For dim light output, adjust the brightness settings or clean the lens. If the light flickers, secure the headband tightly. Water ingress issues should be addressed by drying the unit and ensuring all seals are intact. Refer to the warranty for any manufacturing defects and contact customer support for further assistance if problems persist.

Safety Precautions and Guidelines

Always follow safety guidelines to ensure safe and reliable use of your Black Diamond headlamp. Avoid submerging the device in water beyond its IPX rating. Never modify the headlamp, as this may void the warranty and create hazards. Keep the headlamp out of reach of children. Be aware of electromagnetic interference, especially near avalanche transceivers. Use the headlamp responsibly to avoid accidents, and store it in a dry, cool place to maintain performance and longevity.

Important Safety Information for Proper Use

To ensure safe and proper use of your Black Diamond headlamp, follow these guidelines: Avoid submerging the device beyond its IPX rating. Never modify the headlamp, as this may cause malfunctions or hazards. Keep it out of reach of children. Be aware that high-power modes may generate electromagnetic fields, potentially interfering with avalanche transceivers. Store the headlamp in a dry, cool place to maintain performance. Use only authentic Black Diamond batteries or recommended replacements to prevent damage. Always adhere to these precautions to ensure reliable operation and longevity.

Preventing Electromagnetic Interference

To minimize electromagnetic interference (EMI) from your Black Diamond headlamp, keep it at least 15 cm away from avalanche transceivers and other sensitive electronic devices. Avoid using high-brightness modes near such equipment. If interference occurs, switch off the headlamp or move it farther away. This precaution ensures optimal performance of both your headlamp and other critical devices, especially in safety-critical environments like backcountry skiing or search and rescue operations.

Warranty and Customer Support Information

Black Diamond headlamps are covered by a limited warranty for defects in materials and workmanship. For inquiries, contact Black Diamond Customer Support at www.BlackDiamondEquipment.com or call their support team for assistance with repairs, replacements, or general questions.

Warranty Coverage and Terms

Black Diamond headlamps are covered under a limited warranty for defects in materials and manufacturing. The warranty period varies depending on the product and region. For specific details, refer to the warranty section on Black Diamond’s official website. Coverage includes repairs or replacements at no cost, provided the defect is not due to misuse or normal wear. Customers must provide proof of purchase to validate warranty claims. Visit www.BlackDiamondEquipment.com for more information.

Contacting Black Diamond Customer Support

For inquiries, repairs, or general questions, contact Black Diamond customer support via their official website: www.BlackDiamondEquipment.com. You can also reach them at info@blackdiamondequipment.com or by phone at +1-800-775-5552. Their European office is located at Hans-Maier-Straße 9, 6020 Innsbruck, Austria. Stay updated by subscribing to their newsletter for product updates and support information.

Summarizing Key Points for Effective Use

For optimal performance, always read the manual thoroughly. Turn the headlamp on/off using the ON/OFF button and cycle through modes by pressing again. Lock the headlamp by holding the LOCK button to prevent accidental activation. Regularly charge or replace batteries, and store them properly. Avoid electromagnetic interference with avalanche transceivers. Use red light modes for preserving night vision. Adjust the headlamp securely for comfort and ensure it’s tightened firmly. Follow safety guidelines and maintenance tips for extended lifespan and reliability.

Encouraging Safe and Responsible Usage

Always follow safety guidelines to ensure proper use of your Black Diamond Headlamp. Avoid electromagnetic interference near avalanche transceivers. Handle batteries carefully and store them securely. Use the headlamp responsibly in sensitive environments. Regularly inspect for damage and maintain cleanliness. Follow charging instructions to prevent overcharging. Adhere to local regulations and respect nature. For issues, refer to the troubleshooting section or contact customer support. Safe usage ensures longevity and reliable performance, enhancing your outdoor experiences responsibly.

Page 10 of 11

Powered by WordPress & Theme by Anders Norén